The Planted Tank Forum banner

75g Native Stream Tank w/DIY Foam Rock Wall and Faux Roots

19K views 77 replies 19 participants last post by  Chasmodes  
#1 ·
I've posted a few times about my tank piggy backing on someone else's thread, and thought that maybe it would be better to post a journal of this tank.

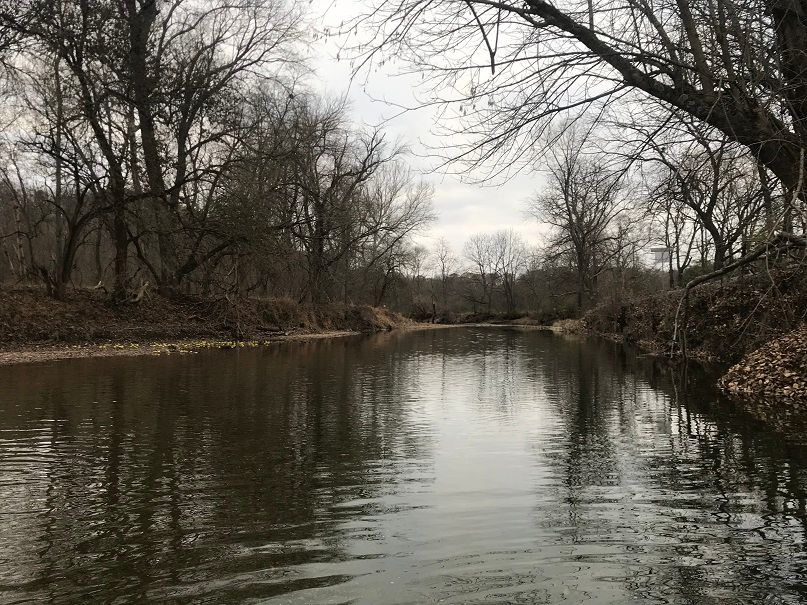
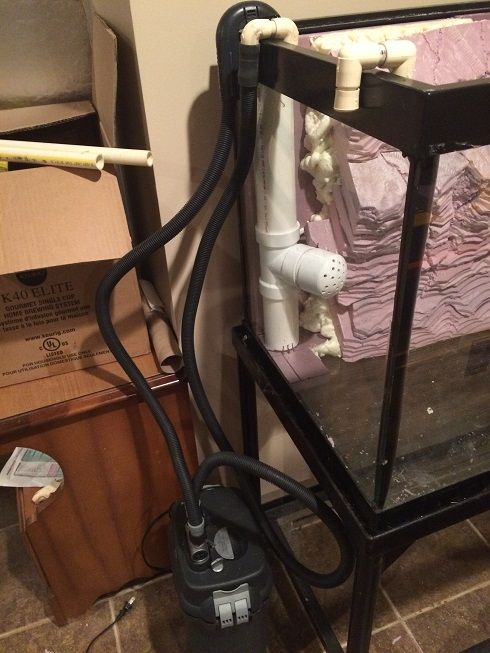
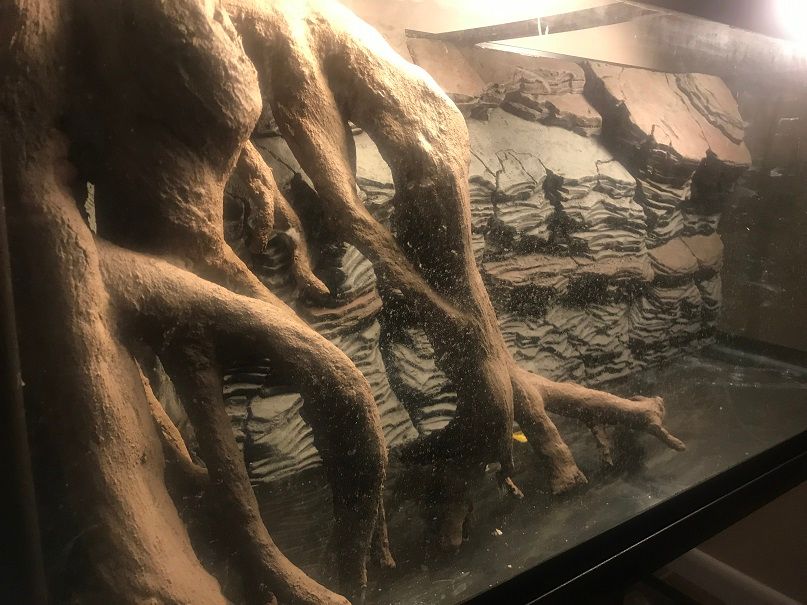
Concept: This tank represents a simulated river undercut bank using faux roots against a faux DIY rock wall made of styrofoam hobby boards, spray foam, and other inert supplies. The fish and plants will be native U.S. species local to where I live, and will consist of smaller fish, not larger predatory fish. I'll discuss my plan for stocking later. The main plant species will be water stargrass (Heteranthera dubia). The purpose of the faux roots is to hide the large powerhead that will drive most of the tank current, that flows at the front of the tank from left to right, and forms and eddy. The rock wall is for decor, but also to hide my canister filter intake. The canister filter spray bar will also be a the right side of the tank, shooting water over the top of the roots to better simulate (sort of) unidirectional flow.

I've kept native fish before, and loved that tank. But, this is one of my dream tanks, to go all out and make it a nice feature in my home, not just a tank.

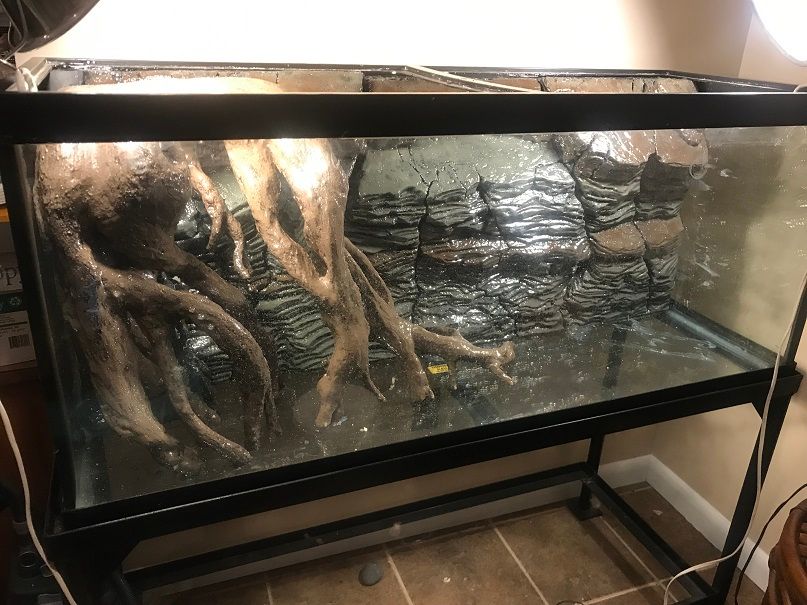
Tank, Stand and Equipment: I was given a 75g tank from a family member a few years ago, and bought a cheap iron stand off of Craigslist. He also gave me a Fluval 405 canister filter. Another buddy of mine welded additional support and feet to the stand. I purchased a Hydor Koralia 3G circulation and wave pump to generate current the tank to simulate stream flow. I recently purchased a Fluval Plant 3.0 full spectrum light.

Decor:
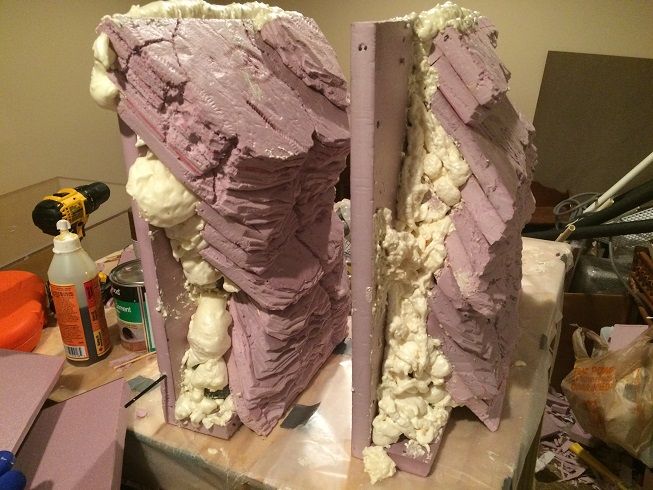
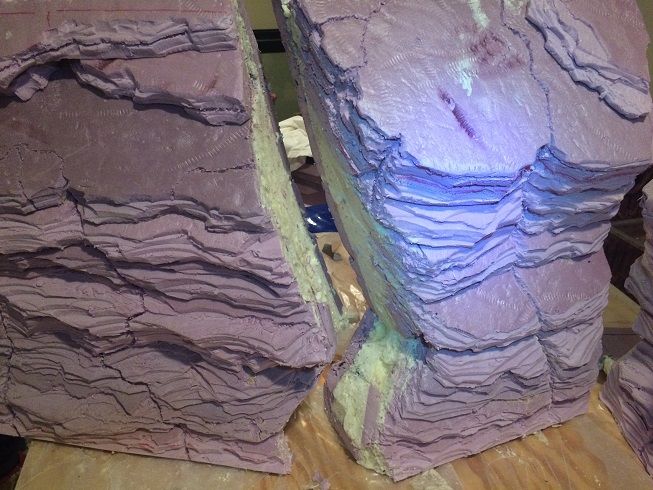
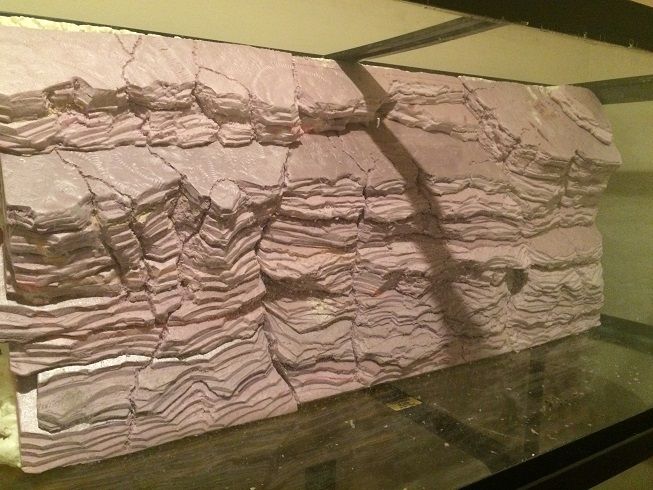
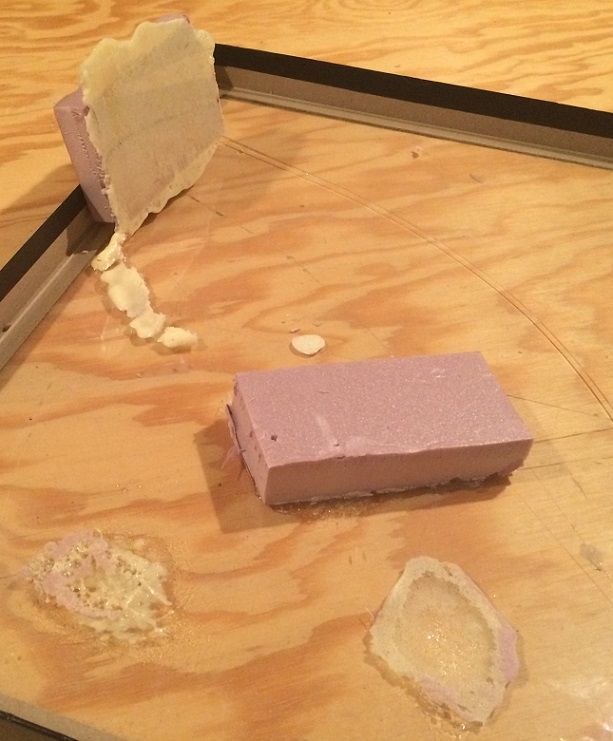
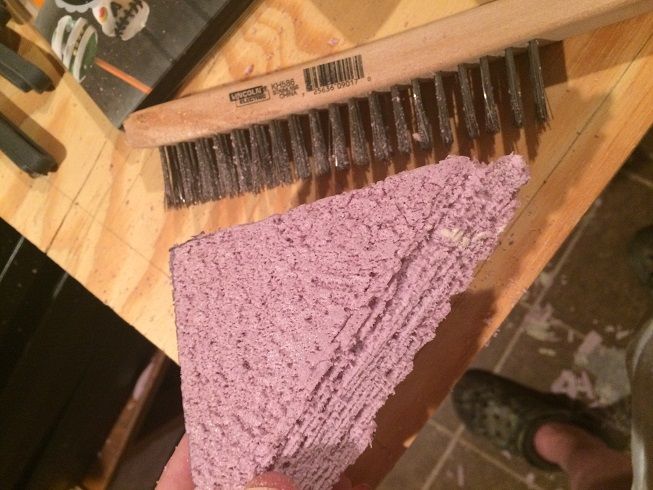
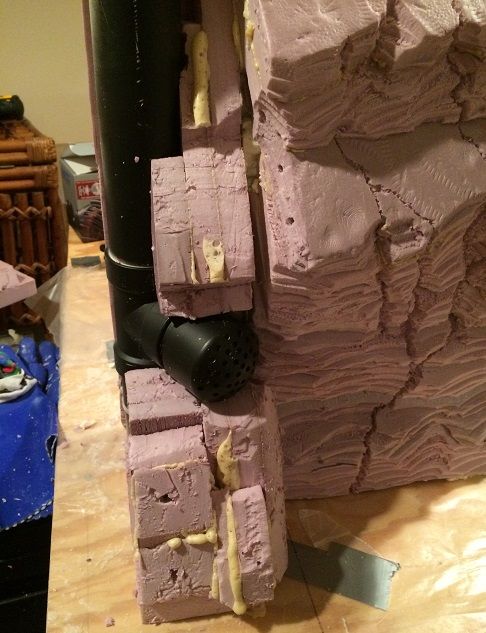
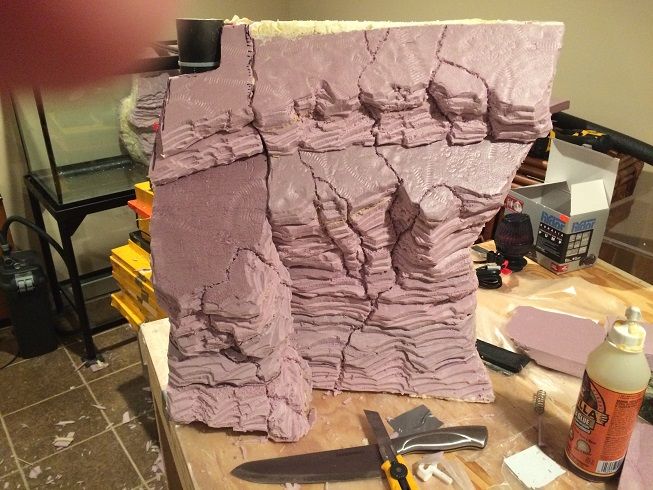
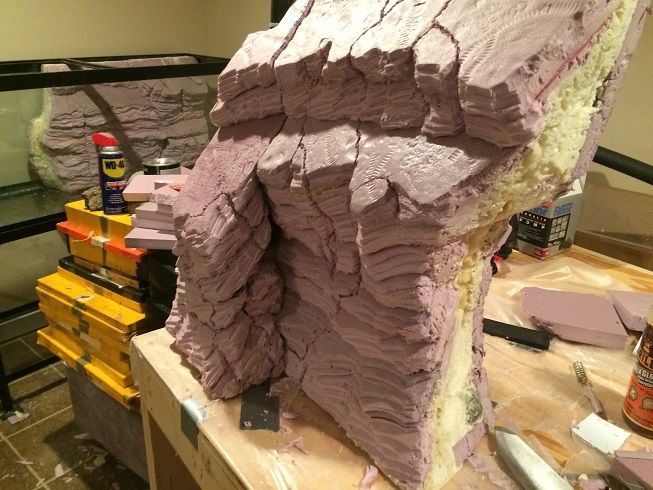
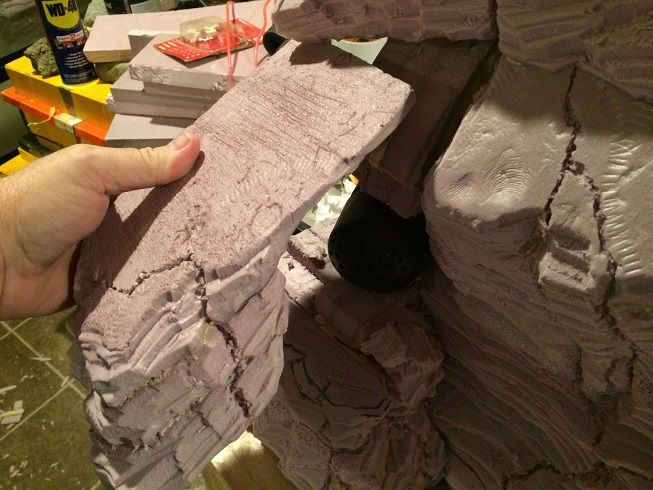
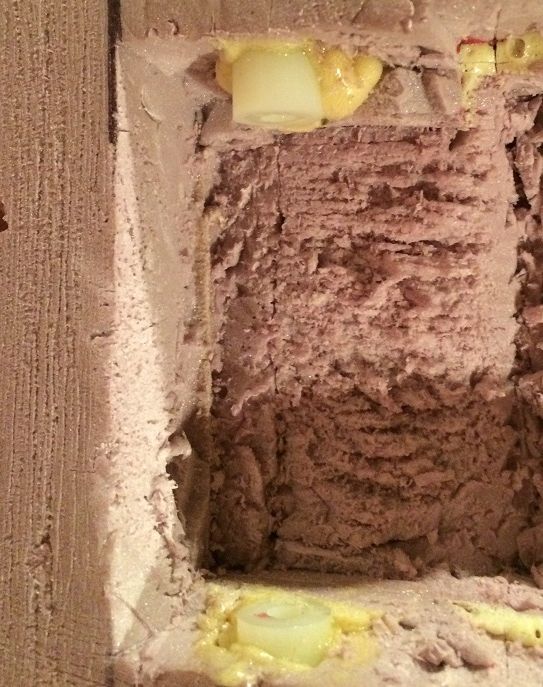
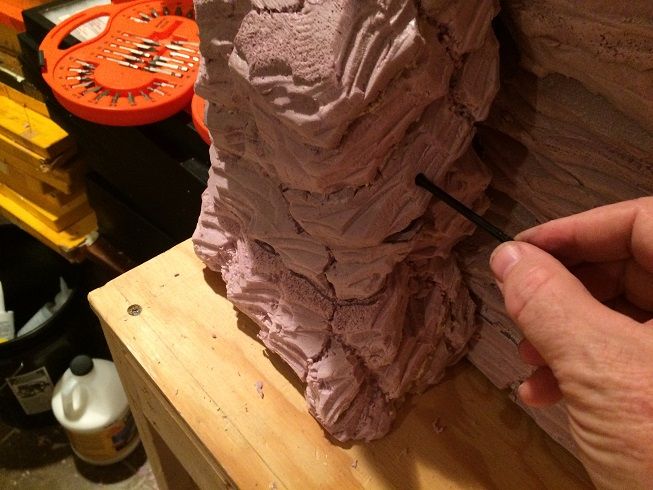
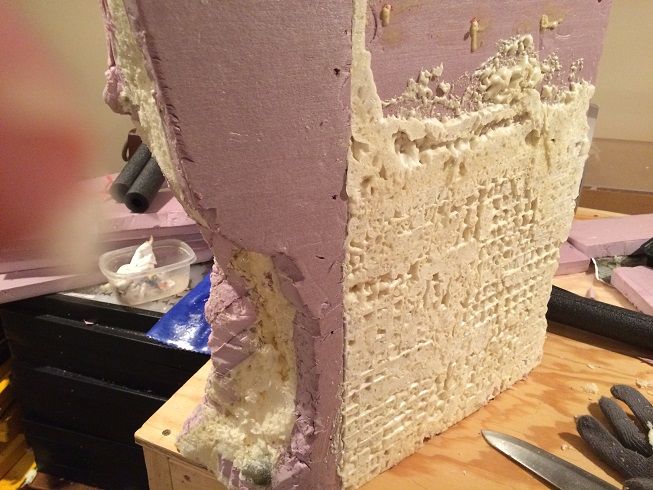
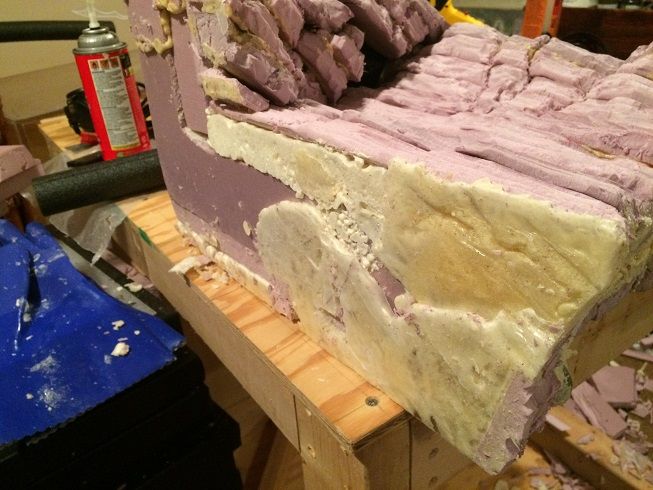
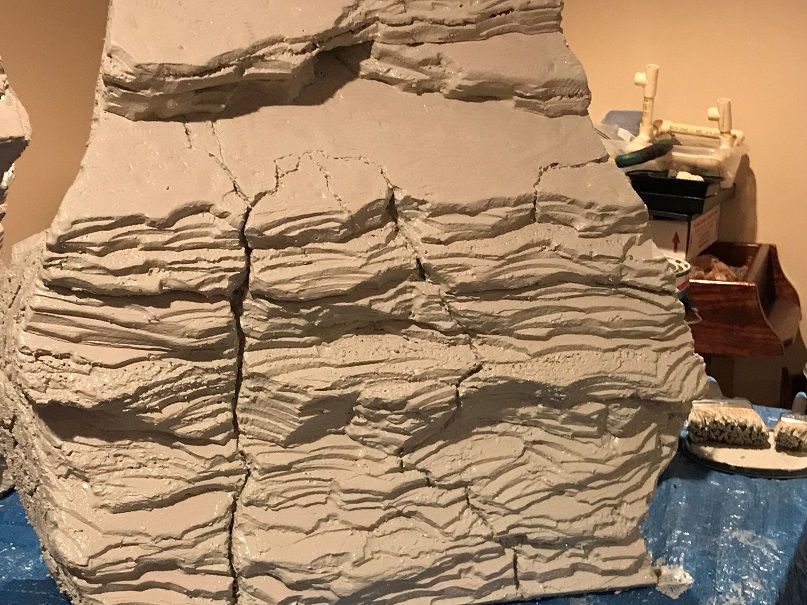
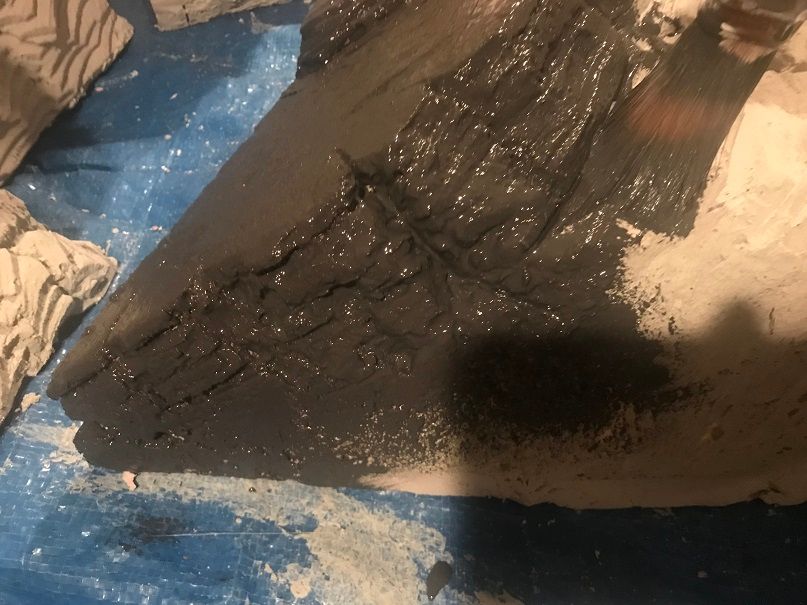
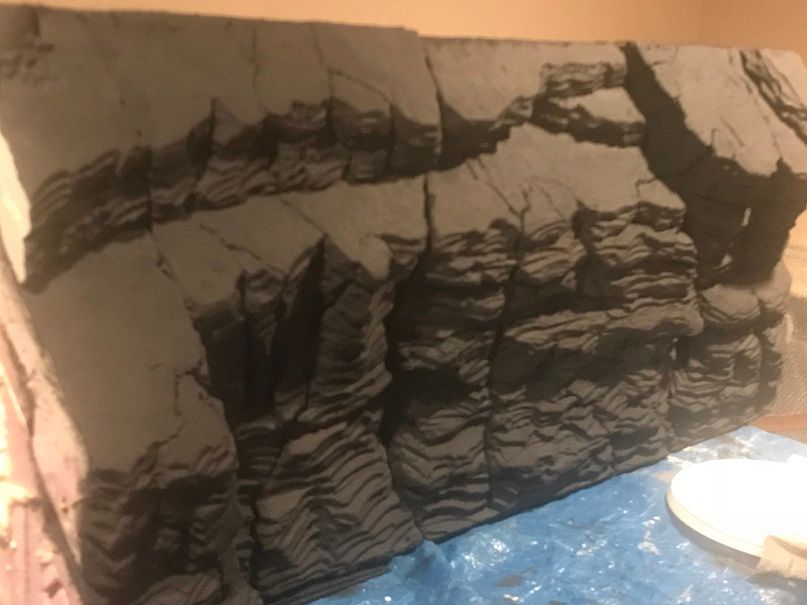
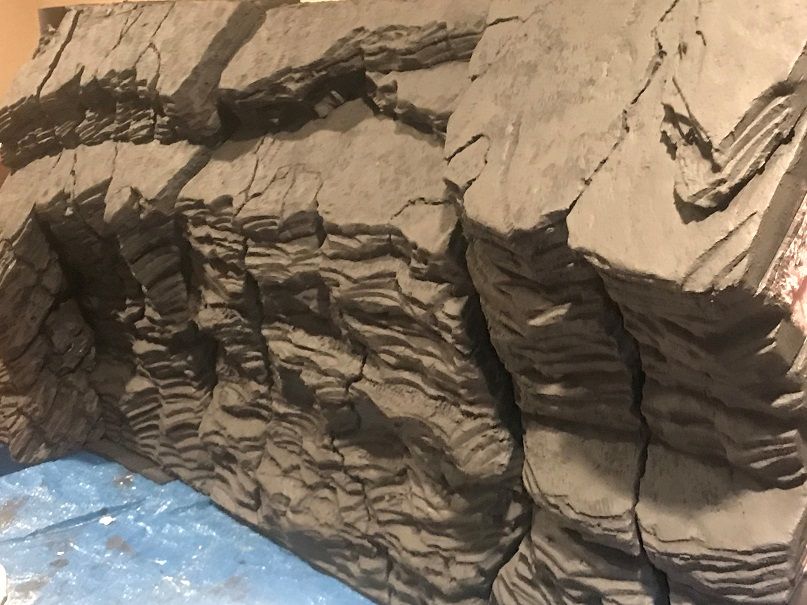
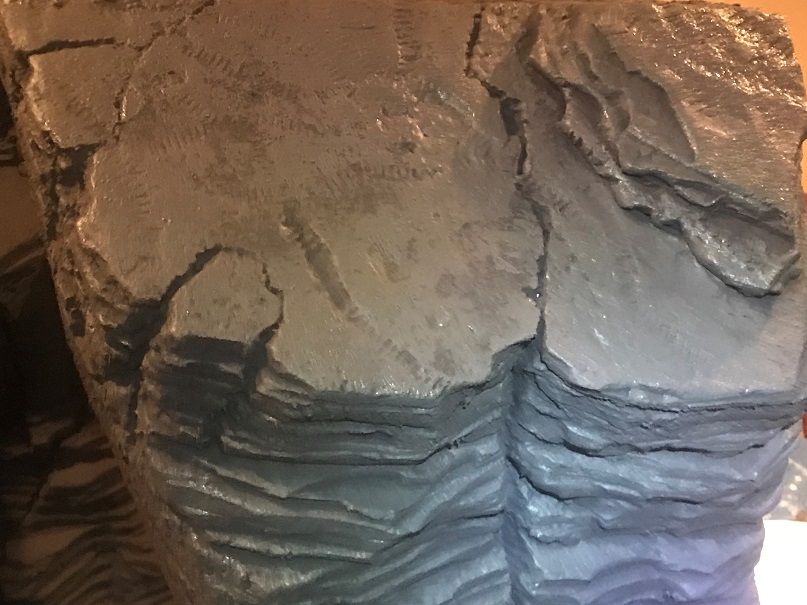
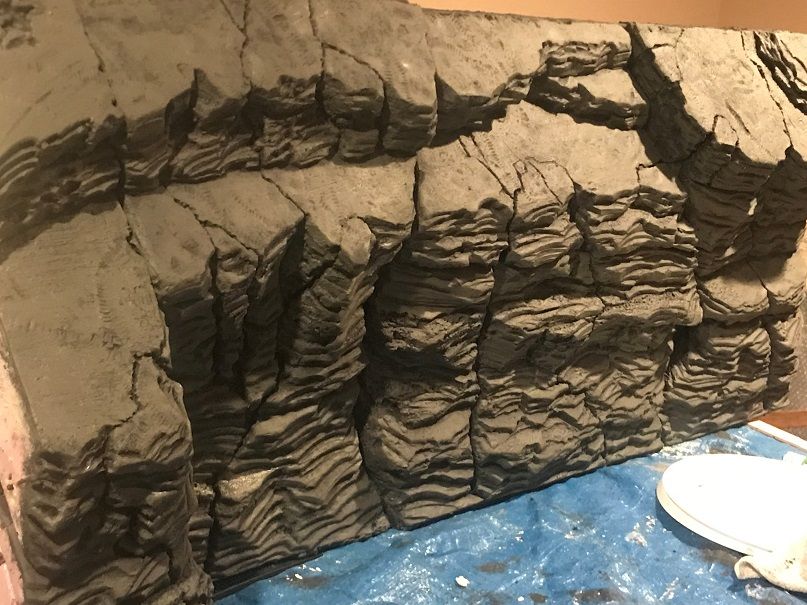
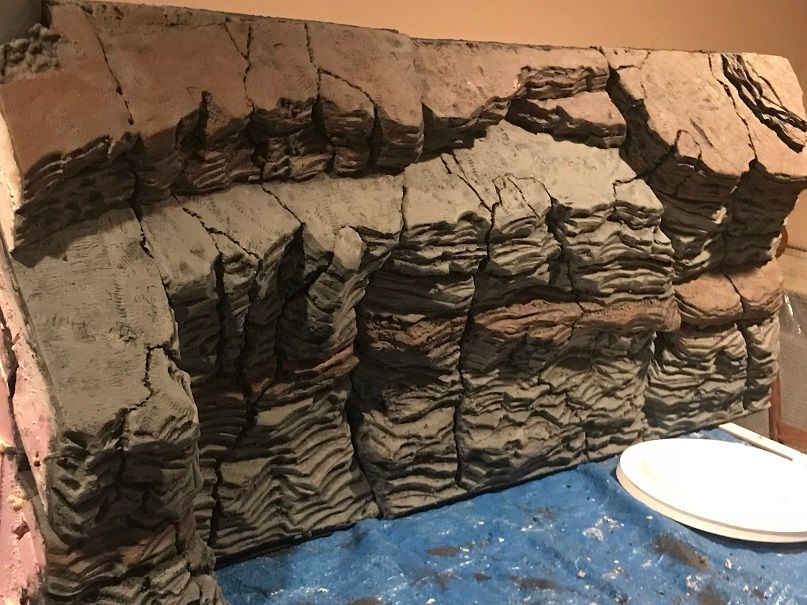
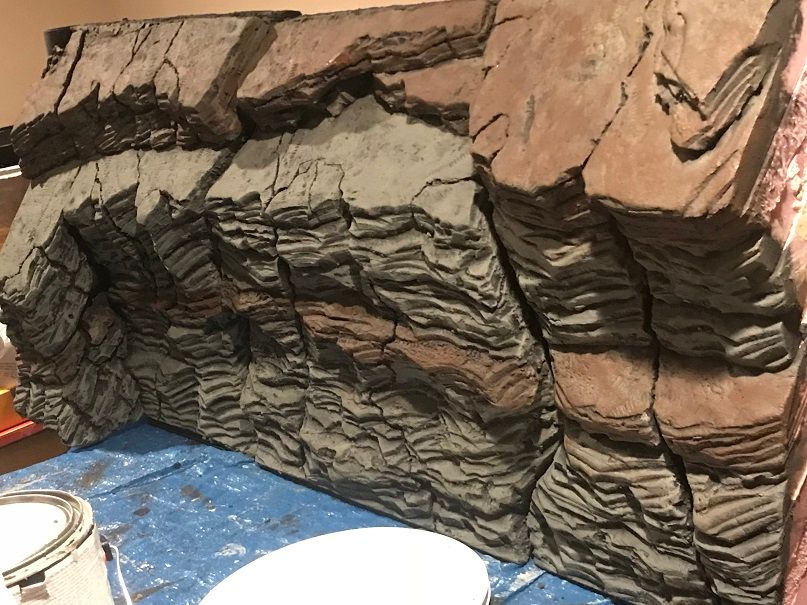
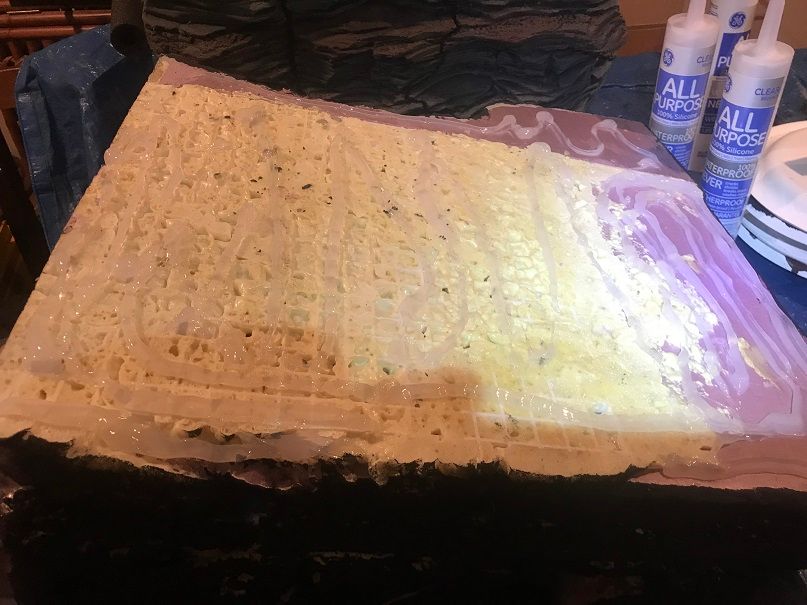
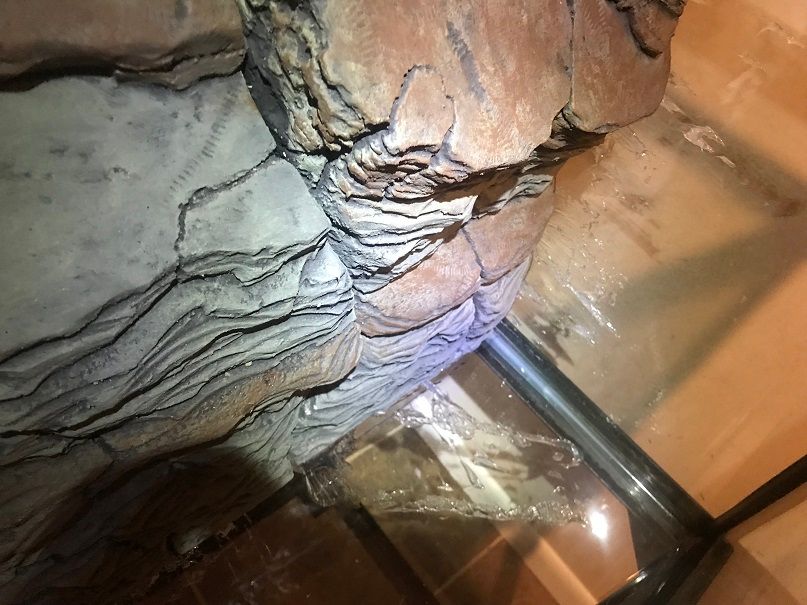
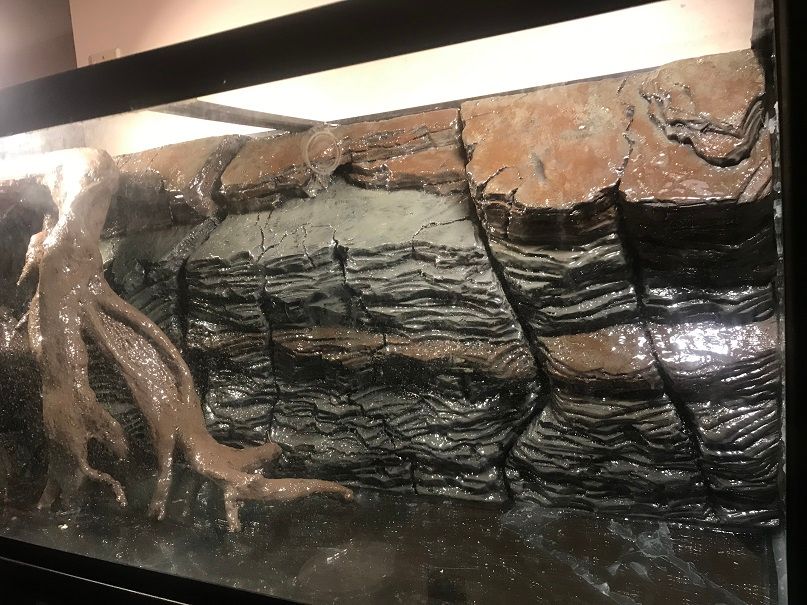
I created a faux rock wall using foam boards by cutting the board into to be rock layers, and carved each board separately, and then glued them into place, until I finally had my overall structure. Each foam board was glued into place using Gorilla Glue and secured to the boards underneath using plastic popsicle sticks. After that, I painted the rock wall with Drylok mixed with cement dye. I didn't want to just stack the foam horizontally to get the fireplace look, rather, I wanted the rock layers at an unusual angle, something different. The overall structure is made up of three sections. Each of the sections had gaps behind the foam board, so I fill the gaps with river rock and used spray foam to hold everything into place. Once the structure was completed, I used a ton of silicone to install the three sections, each of which fit tightly to the back wall and aquarium frame. As you all may know, foam floats and can tear away, so the extra silicone may seem like overkill, but, I wanted this to stay in the tank permanently. Once installed, I covered the wall with Polygem 1319 clear coat to protect the foam and make it easier to clean without ruining the finish.

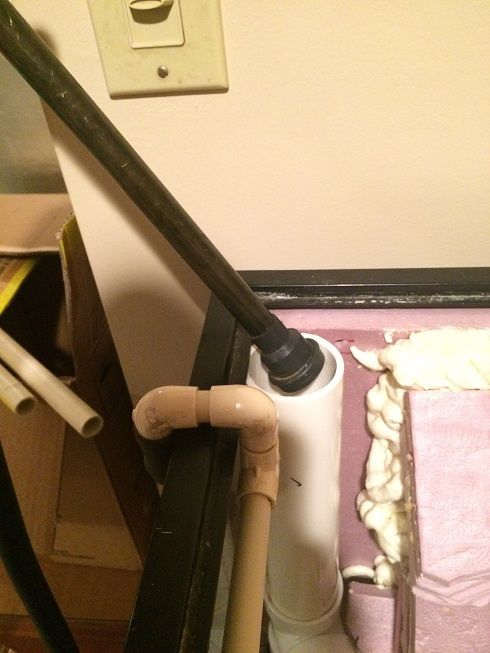
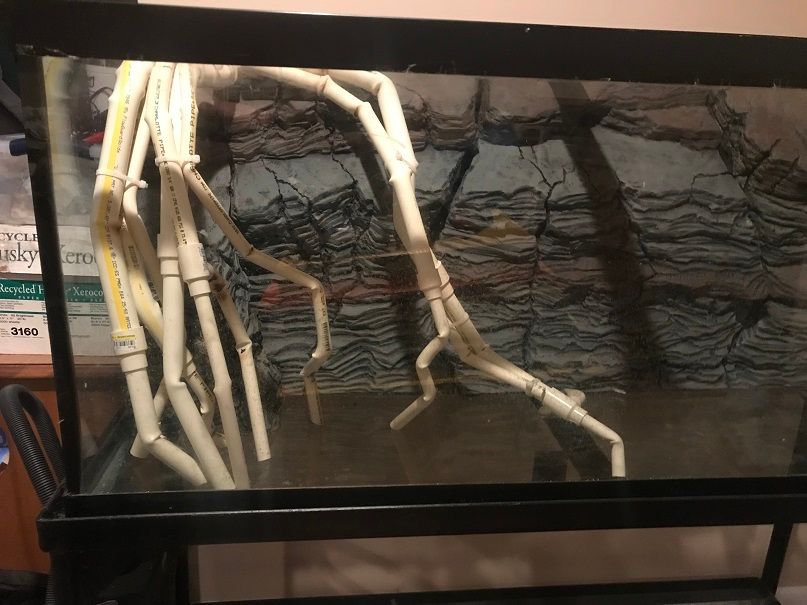
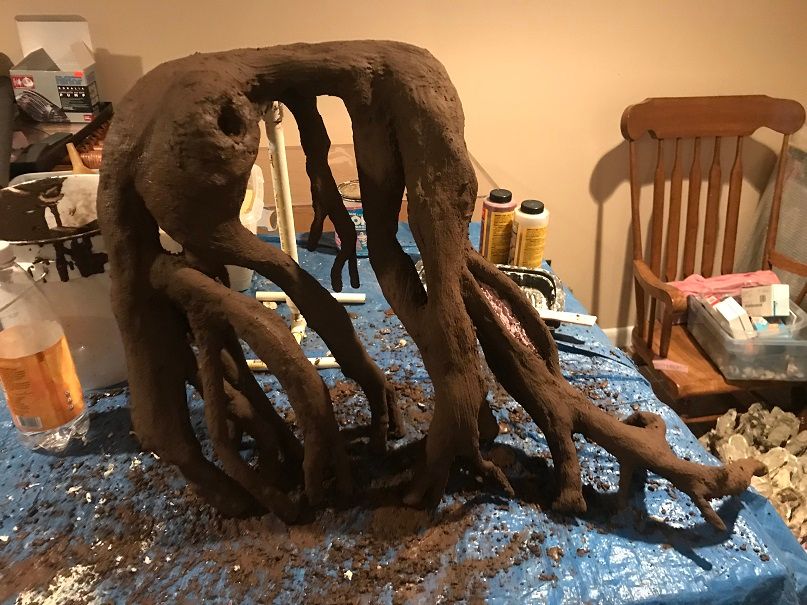
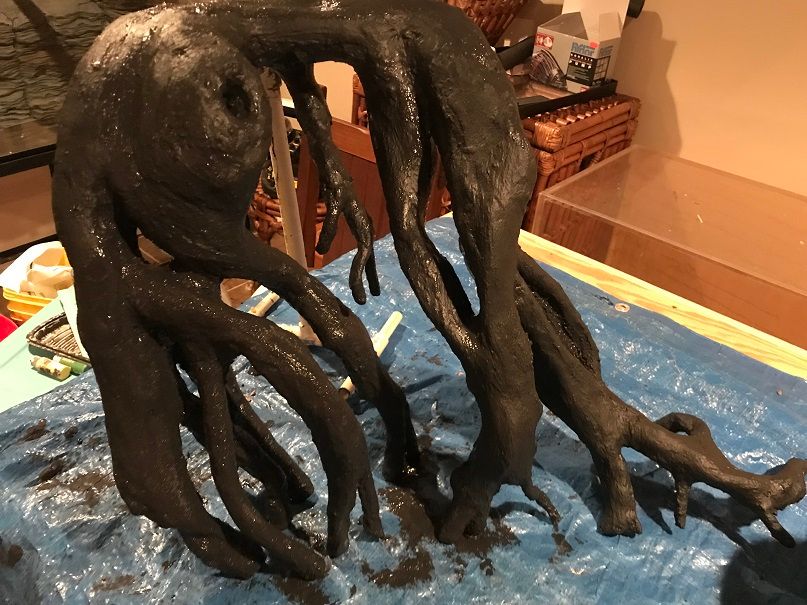
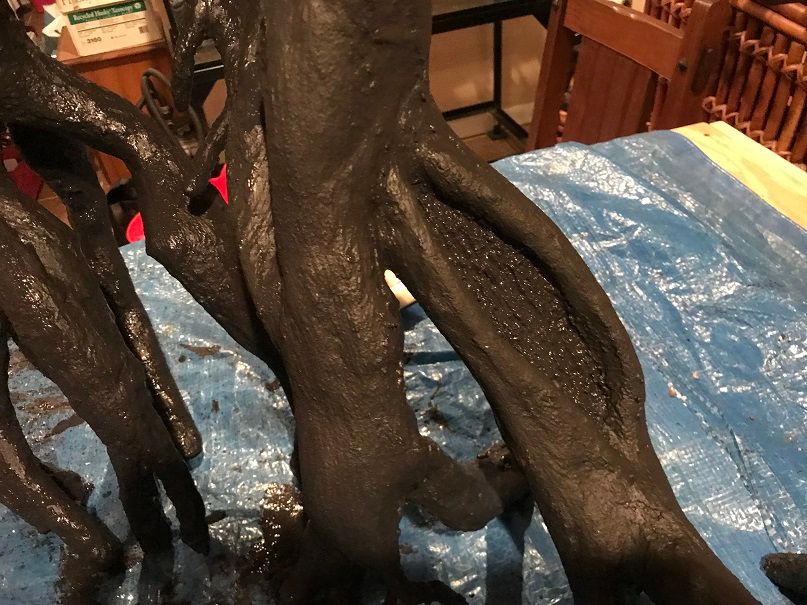
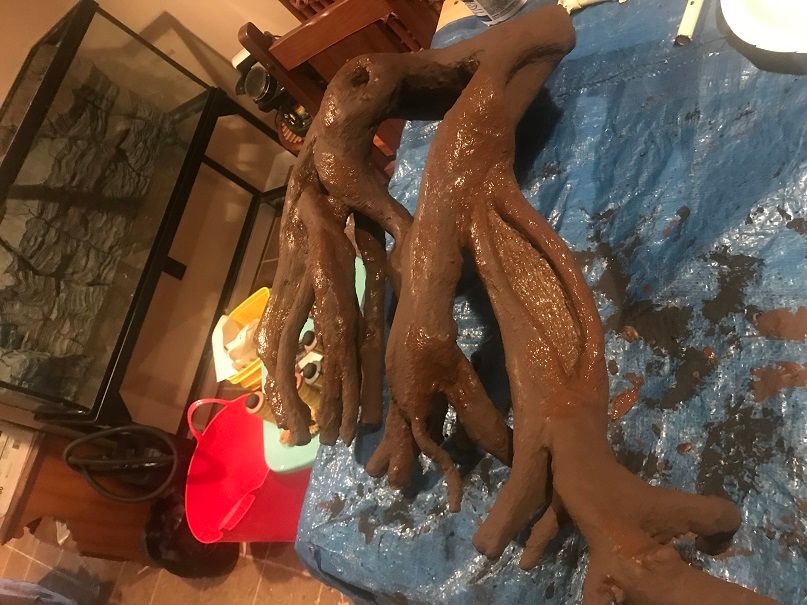
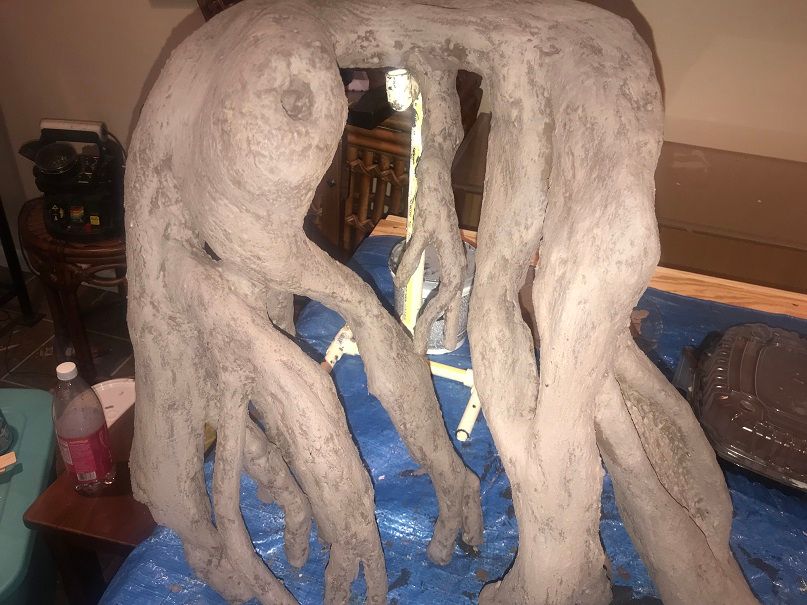
I also created faux roots, using PVC and CPVC pipe, zip ties, plaster wrap for bulk, spray foam, a small piece of foam board, grout and acrylic additive, painted with Drylok mixed with cement dye, and sealed with Polygem 1319 clear coat to seal everything in. Again, the purpose of the roots, other than decor, is to hide equipment as much as possible.

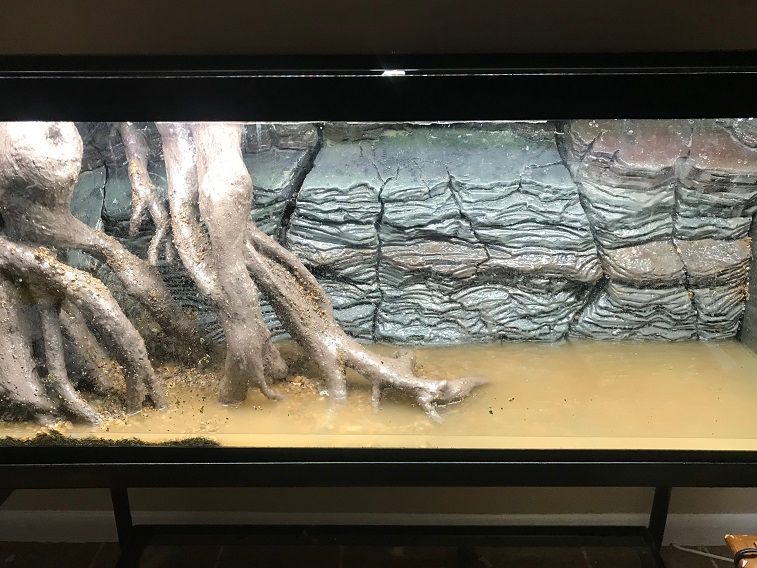
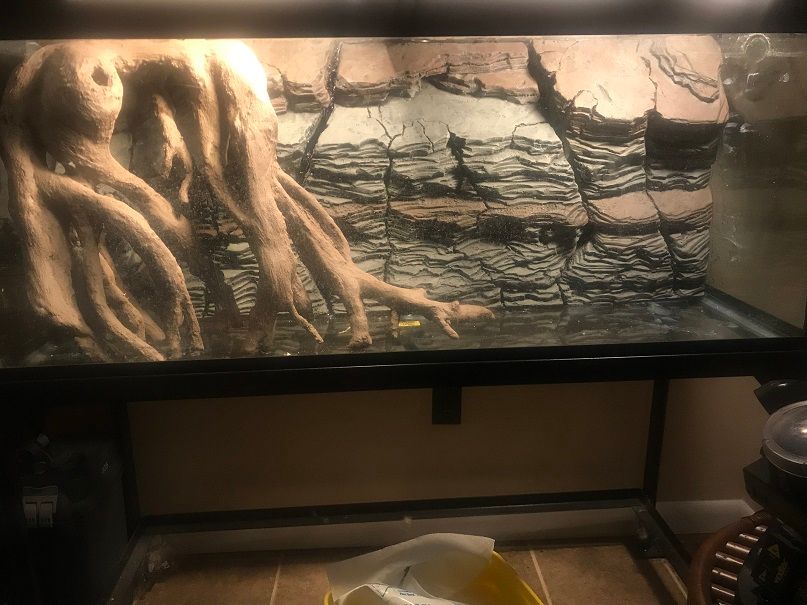
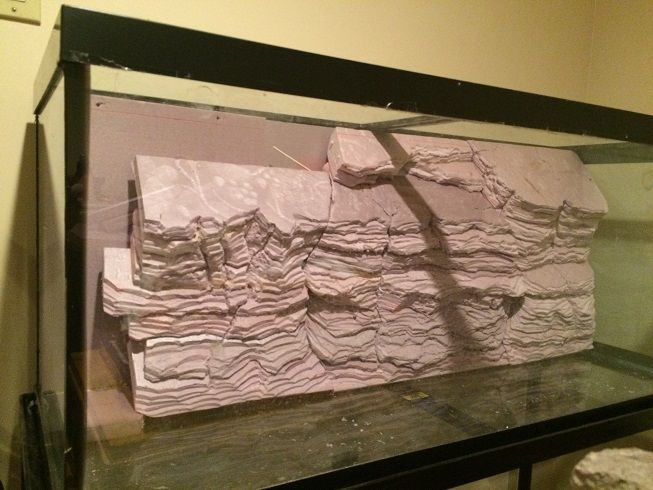
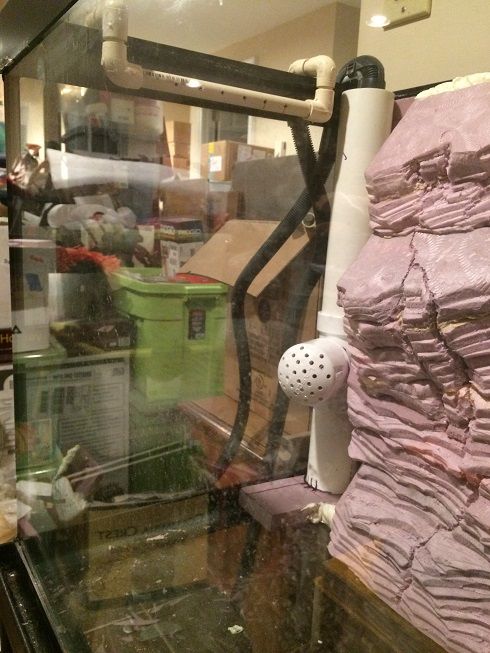
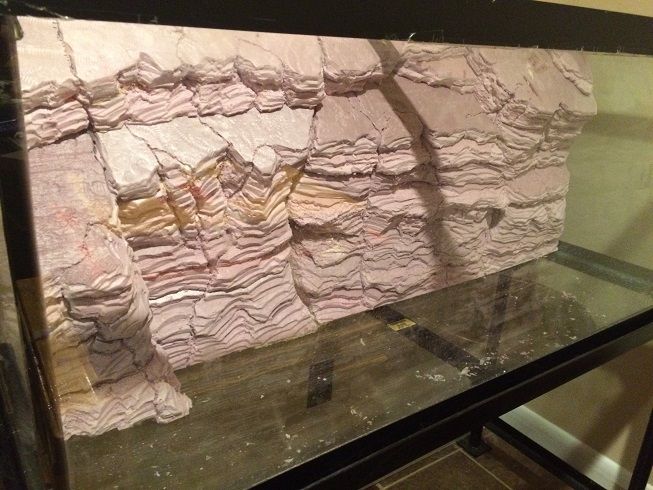
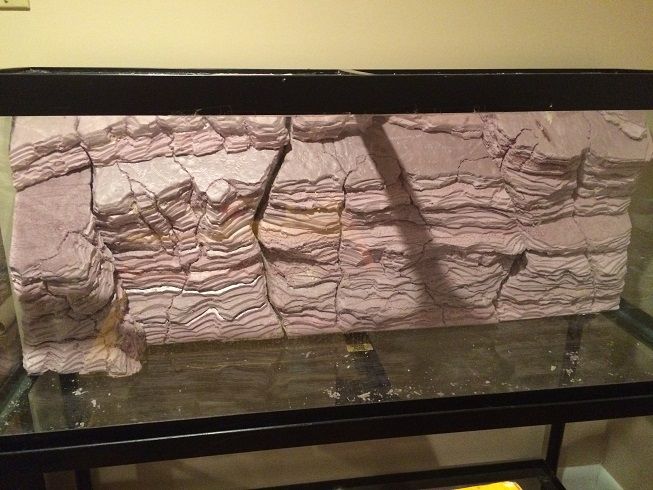
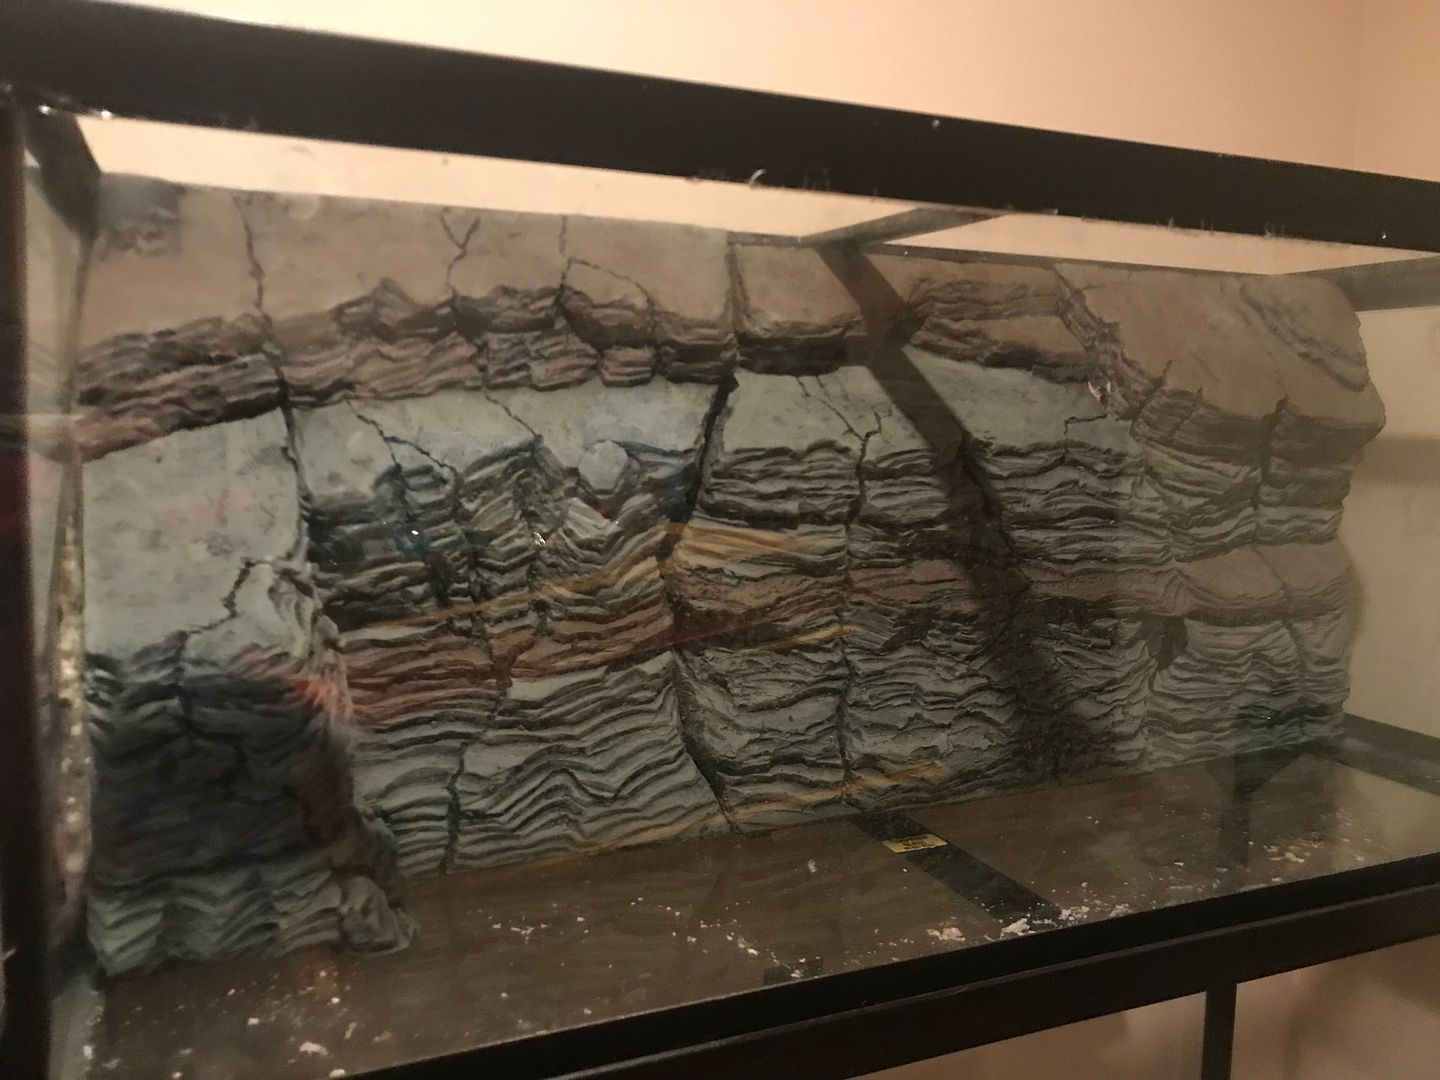
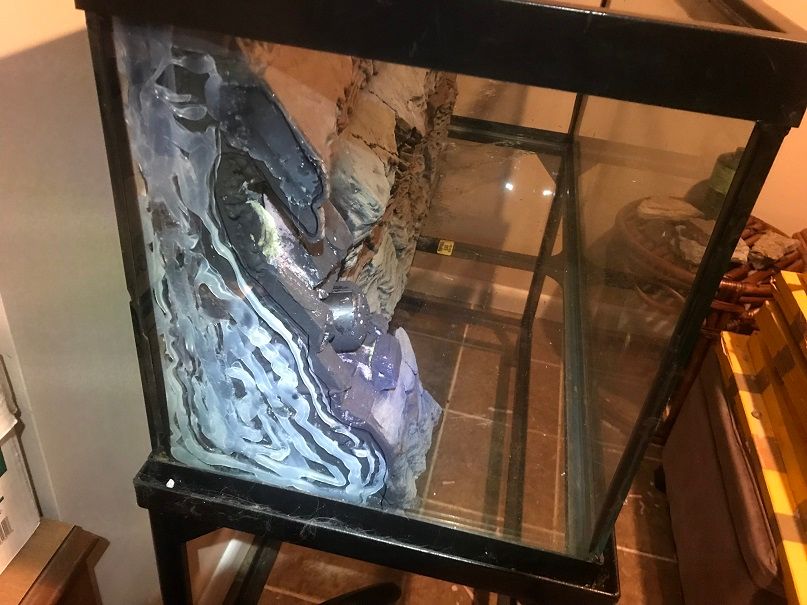
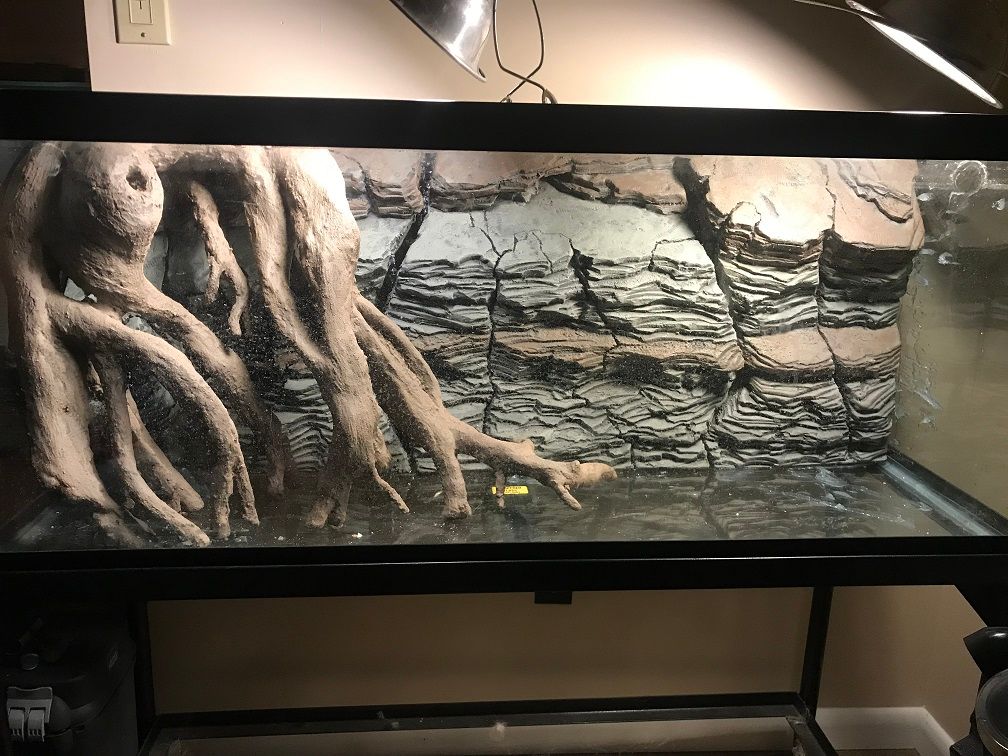
Here is the tank after installing the foam wall and prior to applying the clear coat, and prior to filling.
Image


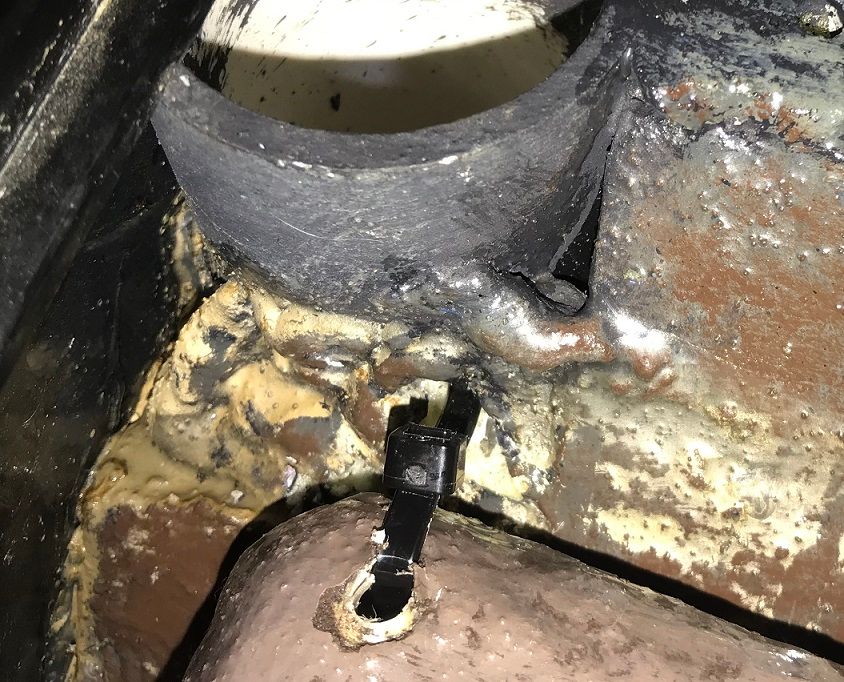
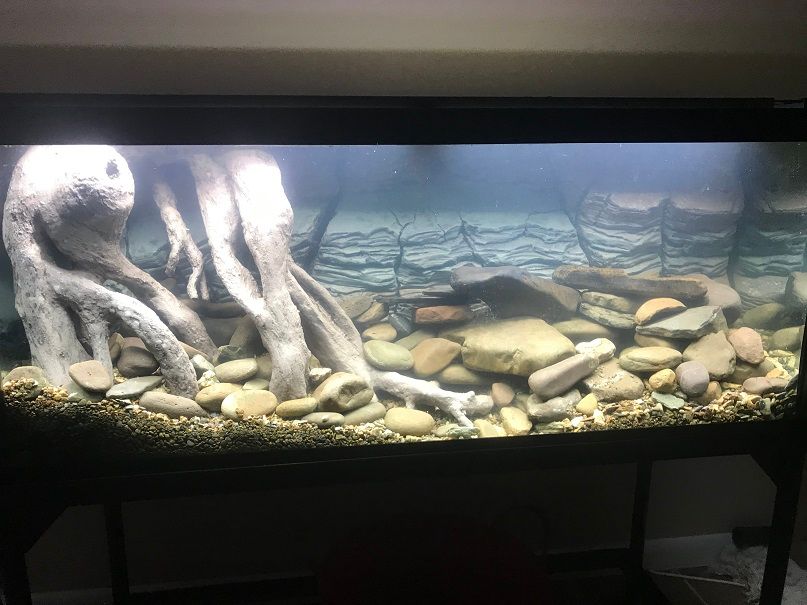
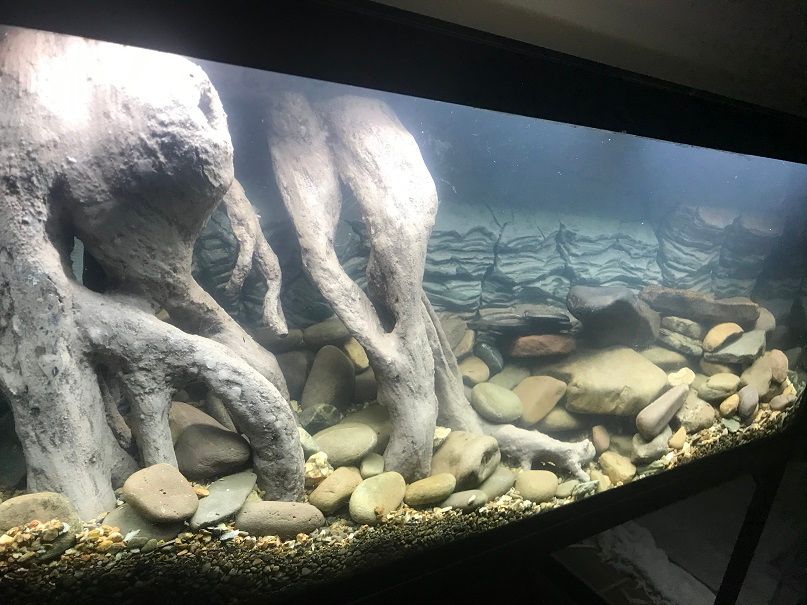
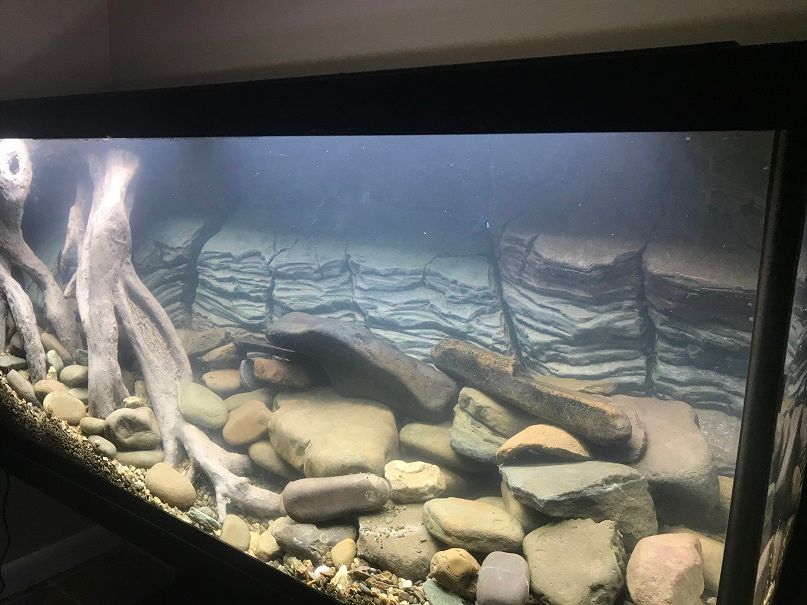
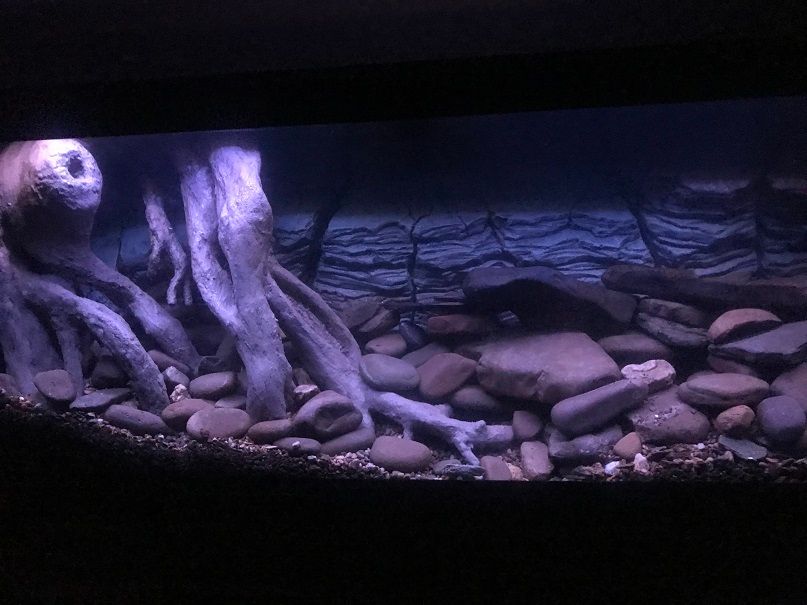
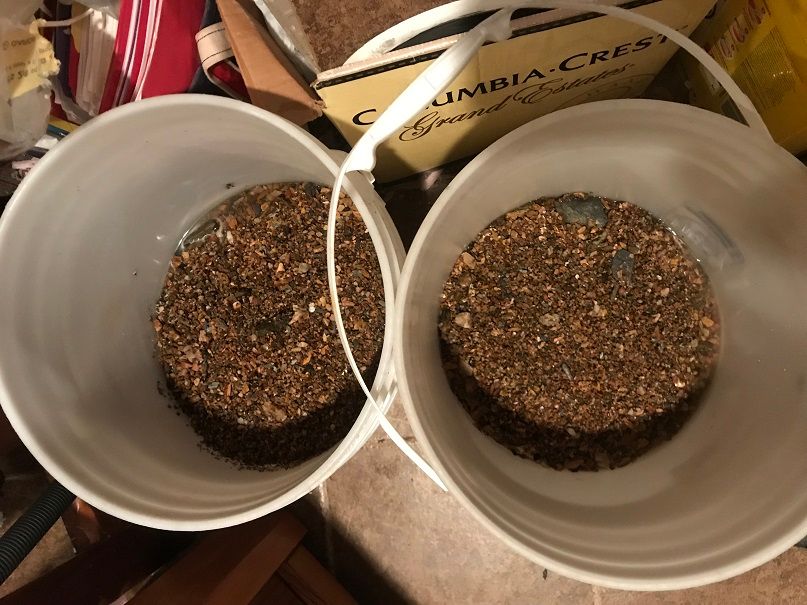
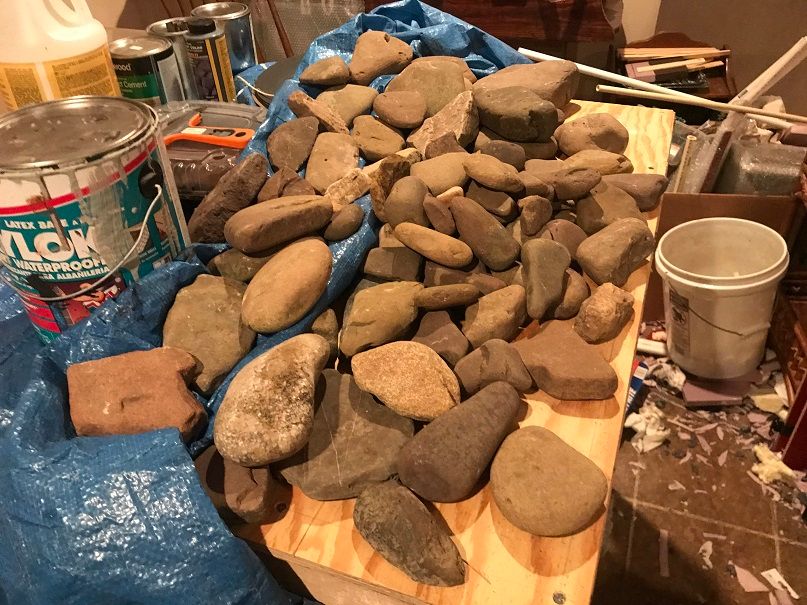
Where I am today with the build, 3 years in the making: I collected rocks and gravel from local rivers and streams, washed and sifted them, and scaped the tank, then filled the tank with water. This was really a test to see of the rock wall would hold underwater, and if the roots would float or not. After three days, the rock wall is holding up fine so far. I'm going to leave it alone until this weekend. The roots, however, floated just enough that they would block my DIY spray bar flow. So, I'll have to drain the tank half way this weekend, and secure the roots to the structure. I want them removable for tank maintenance and cleaning. By securing them, I can't just lift them out, but, I've figured out a way to secure them temporarily, and easily secured again. More on that later.

I hope you enjoy the tank build thread. Future posts will detail the steps that I took to get here.
 
#2 ·
Creating the DIY Foam Rock Wall

I started out by creating a frame to which I would glue in small sections of pink styrofoam hobby board that I'd carve and glue in one at a time. At first, I started creating one section, but as I went along, I worked on the other two sections as well. Three sections wall were ultimately needed in order to be able to install the final product.

Frame of the right side section (ultimately, I removed the right panel):
Image


Initially, the frame was held in place using Gorilla Tape and wooden cooking skewers. The skewers worked out great for temporarily holding the carved foam rock layers in place is I worked on subsequent layers.
Image


This pic shows a few layers carved and glued, for the right and middle sections. Each board was attached to the board underneath using Gorilla Glue and secured using plastic popsicle sticks that were glued into place, connecting the upper layer to the ones below it. I had to trim the popsicle sticks, usually, half of one was about the right size. They were easy to cut. You can see the picture of a rock wall that I used for inspiration and as a reference to guide me.
Image


Here's how I worked, from the bottom layers building up, and one section carved next to the other to get a good fit and a look that I wanted. The idea for the joints between the sections was to not make them straight lines, but to simulate fissures as you'd see in a real cliff.
Image


I used a cement block (created as DIY rock and not used in a tank that I had laying around), as a weight to hold glued layers together. This was a pretty heavy cement rock, and it left a texture that I found really cool. So, I used this cement rock to duplicate that texture on each layer. I found other ways to add detail and will show you in future pics:
Image


Here you can see the popsicle sticks that I used. They easily fit into the holds that I punched with the wood skewers. I also used a drill bit sometimes. The Gorilla Glue really bonded to the foam boards and popsicle sticks nicely, making them impossible to separate:
Image


Bump: As I worked up each layer, you can see how I had to angle the popsicle sticks to achieve maximum contact for bonding. I used loose foam boards to support the structure as I carved and glued each layer:
Image


I used a generous amount of glue spread on each layer, using foam scraps to spread it around. I needed weight to add on top of the glued layer to keep the foam from expanding. Gorilla glue does that. A thin layer is all you need:
Image


Obviously, I didn't want can impressions in the top layers of the foam as I went, so, I stacked the cans on rocks, which kept up a natural looking texture on each foam board:
Image


Pushing the concrete and rocks into the foam for texture gave me an idea. I'm an avid fossil collector, so, I thought that perhaps I could simulate fossil rock layers by pressing in shells and other objects into the foam. This shell simulates a bivalve or brachiopod fossil:
Image


I also used coral, springs, and threaded nuts to simulate other fossils by pressing them into the foam boards after I finished carving them:
Image


Here, you can see the resulting detail of some of the faux fossils. Springs bent and pressed into the foam created faux crinoid stem fossils. If you look closely, you can see the effect of the coral and shells pressed into the board as well, creating a faux fossil hash plate:
Image
 
#3 ·
I kept up the process as the work completed from right to left, and bottom to top. Every now and then, I'd fit all three structures into the tank to make sure that they were a good, tight fit:
Image


Comparing my work to my inspiration picture, not perfect, but, similar:
Image


Then, it occurred to me that all this would float, and if not a solid structure throughout, could break up. So, I stuffed the gaps with river rock that I bought at a local chain hardware, and used spray foam to secure them in place. This also helped to secure the carved rock layers to the foam frame that would be later glued to the tank:
Image


Spray foam is messy, so it's wise to use latex or rubber gloves when working with it. After a while, it expands, so I carved the excess away as much as possible. I also punched holes in it to allow the insides to cure properly:
Image


The right and middle sections are shown here carved to make a nice fit and look:
Image


Here, the right and middle sections are mostly done and carved, loosely fitted into the tank:
Image


Here are all three sections fitted into the tank. The third section wasn't complete yet, as I had to build my filter intake:
Image


Bump: At this point, I was curious about gluing it all to the glass. What product would work best to keep this monster wall from tearing away and floating to the top? My concerns with silicone were that, when I tried using it to glue foam boards together, it easily separated. So, I wondered about using Gorilla Glue against the glass vs. silicone. Here, I tested foam boards with silicone vs. Gorilla Glue glued to the glass. Gorilla Glue separated, and the silicone held firmly in place. I had my answer:
Image


I thought this was cool, as I experimented with using a wire brush on the foam. I scraped and hammered the brush to the foam, and produced this test piece. I later incorporated these techniques into the final structure:
Image


Here are a few pictures showing the stand pipe and intake designed to hide my canister filter intake tube. I wanted it accessible and easy to clean. I drilled holes into the large PVC cap, that is not glued in place and is removable. You can also see my initial spray bar design. I will be using a different design, to be constructed soon and shown to you later:
Image

Image

Image


The last carving part of the project was to hide the stand pipe. I painted the piping black, and started building the foam structure around it:
Image
 
#4 ·
I created a carved foam layer that is removable, so I can access the PVC intake pipe for cleaning and maintenance. I wanted to completely hide the pipe and still be able to get to it, and have it functional:
Image

Image

Image


The third left section is almost done here, hiding the stand pipe:
Image


I had to find a way to secure this piece so it didn't float away and also didn't wiggle in the current. So, I inserted two nylon bushings into a piece of foam, and glued it to the base below the removable section:
Image


On the bottom of the removable carved rock section, I also glued a couple more bushings in place, then carved out the inside to create room for the base in the above pic to fit:
Image


Then, all I do to secure it all in place is to insert one of those plastic popsicle sticks through all four bushings!
Image
 
#5 ·
When gluing and carving, sometimes things didn't fit flush to the glass, so I had to make some adjustments, to give a nice connection from foam to glass with silicone. Here, on one section, I used Gorilla Glue to add a piece of egg crate, and then carved away the excess:
Image


I also used Gorilla Glue to fill in gaps at the bottom so each structure was flush to the bottom of the tank:
Image


This pic shows all three sections fitted into place into the tank. You can see the joints between the three sections and my attempt to make them look like real cracks in a rock wall. I was pretty happy with it:
Image
 
#6 ·
Once I was done carving and fitting each section, it was time to paint. I painted the entire structure with Drylok to cover all surfaces to hide the pink foam. I used Drylok because it's a water tight sealer, and many in the hobby have used it successfully on their DIY foam backgrounds:
Image

Image


I really slapped it on good to get it to seep into every nook, crannie, and hole. Surface tension will prevent the paint from getting into tiny holes, so I had to use the brush to really dab the paint into every nook and cranny:
Image


After that, I mixed Drylok with charcoal color cement dye and applied with a brush a very dark coat. I did this to give the structure depth:
Image

Image


Then, I used sponges to dab on various shades of color to bring out details and highlighting. This is the first light color applied to the entire thing:
Image


one thing that is great about using Drylok vs. cement mix to cover foam is that it really allows carved details (like my fossil simulations) to show through. They really showed up well as light shades of paint were dabbed with the sponge over the structure. You can see this throughout the painting.
Image

Image
 
#7 ·
#10 · (Edited)
On Monday, I added gravel and set the rocks into place, and then filled the tank with water. I set up the circulation pump and it ran fine. The water was really cloudy, as the canister filter wasn't ready. I set up my Fluval Plant 3.0 light and downloaded the app, and set it up, and previewed it. I'm really happy with the light fixture.

This really was the first major test though, to see if the rock wall would stay put and not float, and also to test the roots to see if they floated or not. The rock wall, after three days, is still looking good. However, the roots float just enough to block my spray bar output. So, my next step is to secure the top of the roots in a way so I can still remove them and reinstall them easily. The solution is to attach the top back corner of the roots to the stand pipe via drilling holes in each, and using zip ties that can be easily replaced when do maintenance. They will be out of sight too. The bottom of the roots was fine, as it stayed down, it was just the top of the roots that floated a little bit away from the wall.

So, this weekend, I'll drain the tank, remove the sand and rocks, affix the roots, add the sand and rocks, scape it, fill the tank, set up the equipment and canister filter, and hopefully, I'll have a nice picture to share. After that, it's on to tank cycling, and then collecting fish and the stargrass for the tank. Yay!

Oh, and the clear coat shiny finish? When I added water, you couldn't see the clear coat at all. It worked perfectly.

Before I go, here's the stocking list:

Fish: darters, minnows, dace, and shiners, maybe a sculpin. My feature fish will be the rainbow darter (Etheostoma caeruleum) and either satinfin shiners (Cyprinella analostana) or spotfin shiners (Cyprinella spiloptera). I also hope to add fantail darters, greenside darters, silverjaw minnows, rosyface shiners, rosy side dace, and some other species that I may catch.

I also will collect snails often as the darters like to eat them.

Thanks for reading. I'll post updates soon. I can't wait to collect fish for this tank.

Bump:

Thank you Streetwise. That's a really cool rock formation!

Also, I forgot to include this in my previous posts. If y'all are wondering how I actually carved each foam board, here's a video that shows my techniques:
 
#8 · (Edited)
After that, I sponged on different colors to create a layered effect:
Image

Image


The painted wall fitted into the tank:
Image


After painting, it was time for installation. I began by tracing with a sharpie where to apply the silicone to the tank wall. The idea was to apply the silicone, and then push each section into place:
Image

Image


I also applied silicone to each section:
Image


All three sections installed. You can see the thick beads of silicone on this left side view:
Image


Because the structure fit so tightly, I had to push the middle and right structure in at the same time. In doing so, I smeared some silicone on the side and bottom glass. I eventually cleaned off the right side glass using a razor blade:
Image


Next was the roots to simulate the overhang. I started out bending PVC and CPVC pipe with a heat gun, then zip tying them together:
Image


I zip tied rope to the pipes to add bulk and a softer form to the structure:
Image


I also used wire inside air tubing for the smaller branches of the root:
Image


After that, I zip tied some rope to form a knot in the root, and then attached a piece of foam board that I used the wire brush on to simulate a split in the root:
Image


The next steps in the root creation were to add black spray foam to add more bulk and form:
Image
 
#9 ·
Next was to carve the spray foam to improve the root like form:
Image


Then, to complete the form, I applied plaster strips to give more bulk and form:
Image


I wasn't happy with how the knot turned out, so I attached more rope and a bit more spray foam, carved and sanded the foam, then applied more plaster cloth:
Image


The fake roots fitted into the tank:
Image


The next step was to apply the grout mixed with acrylic additive:
Image


The roots were almost done. The next step was to paint them with Drylok mixed with cement dye to get them to a realistic color:
Image

Image


Another layer of Drylok and dye sponged on:
Image


After several layers and colors of Drylok sponged onto the roots, I finally achieved the color that I wanted:
Image


Fitted into the tank:
Image

Image

Image


Bump: The final steps on the roots and wall were to apply the Polygem 1319 clear coat epoxy to seal everything in and protect the structures. I was worried about doing tank maintance or moving rocks around and potentially damaging the rock wall or roots. I was worried that the extra shiny look would show up in the tank.
Image

Image


As you can see in the pics above, the reflections cause the structures to look unrealistic out of the water. However, I read that when water is added, the shiny appearance disappears. The clear coat really does firm things up though. And, many museums and public aquariums use this product, so, it's effective and safe. I really wanted to protect my work.

This past weekend, I collected a five gallon bucket full of gravel for the tank from a local creek near my house. I'm pleased with the overall color of the gravel. It took me hours to sift and wash the gravel to get most of the silt out of it. Here's a tip though, before carrying it very far, it's better to divide it up into to half filled buckets...much easier to carry:
Image


A month ago, while on a fishing trip, I collected a five gallon bucket full of river rocks from my local river. I wanted rocks to look a certain color and have shapes that relate to the wall as much as possible, and still be river worn. This past weekend, I laid them out on a table:
Image


I was ready to aquascape and fill the tank at this point.
 
#11 ·
Great fun! You have already put a ton of work into this tank and the fish still haven't made an appearance. ;)

I am planning a very similar tank in the near future, though not based on a stream technically. I am going to be going a bit industrial and planning my tank around a drainage ditch. The back wall will look like a cement wall with sewer pipes in it that will actually be my return and intakes. I am also planning my tank to be a full native tank with everything in it from North America though not necessarily from my local area.

It sounds like you plan to catch most/all of your fish yourself. I have already caught (and released, not ready to keep them yet) blacknose dace and rosyside dace but I haven't found out how / good location to catch darters. Any tips for darter catching / good locations?

I have been using inaturalist app to find places where fish might be found and also just looking generally when I go to parks.

I am in Ellicott City, where at in Maryland are you?
 
#12 ·
Thank you minorhero! I live between Hyattstown, Clarksburg and Boyds. Your tank plan sounds really cool!

For catching darters and minnows, I'd love to use hand held dip nets, but, unfortunately, you aren't allowed to use them for the species that I'm after, including darters. Maryland has some funny laws regarding that, but it's to protect species that are endangered and/or gamefish, so, I understand. The best way to catch them legally is to use a seine and kick them into the net. Two people working it makes it much easier, but, here's a video showing how to collect fish using a small seine with one person:

Here is the law for using seines in nontidal waters:
(5) Seines in nontidal waters:

(a) Shall have mesh no greater than 1/4 inch;

(b) May not exceed 6 feet in width and 4 feet in height;

(c) Shall only be used to catch minnows and other bait fish;

(d) May not be used within 50 yards of the base of any dam or the mouth of any river or tributary; and

(e) Shall only be emptied from shore.

Let me know if you are interested in getting a seine like this and I can find the manufacturer that I got mine from. I can't remember off the top of my head.

As far as locations to catch any species in Maryland, this is a great site: https://geodata.md.gov/streamhealth/
 
#13 ·
Thank you minorhero! I live between Hyattstown, Clarksburg and Boyds. Your tank plan sounds really cool!

For catching darters and minnows, I'd love to use hand held dip nets, but, unfortunately, you aren't allowed to use them for the species that I'm after, including darters. Maryland has some funny laws regarding that, but it's to protect species that are endangered and/or gamefish, so, I understand. The best way to catch them legally is to use a seine and kick them into the net. Two people working it makes it much easier, but, here's a video showing how to collect fish using a small seine with one person: https://www.youtube.com/watch?v=VCVaXSXWNlY

Here is the law for using seines in nontidal waters:
(5) Seines in nontidal waters:

(a) Shall have mesh no greater than 1/4 inch;

(b) May not exceed 6 feet in width and 4 feet in height;

(c) Shall only be used to catch minnows and other bait fish;

(d) May not be used within 50 yards of the base of any dam or the mouth of any river or tributary; and

(e) Shall only be emptied from shore.

Let me know if you are interested in getting a seine like this and I can find the manufacturer that I got mine from. I can't remember off the top of my head.

As far as locations to catch any species in Maryland, this is a great site: https://geodata.md.gov/streamhealth/
That is a great site! Like all government websites its horrible to navigate but the information in it seems really well put together. I have been jealous of other state's having better information on their local fish species but this is actually pretty good!

I am definitely interested in getting a seine. I was under the impression dip nets were legal but I see from looking into the comar a bit more thoroughly that I was just confusing other sections of the code.

I have had success using minnow traps for well minnows. This is allowed so long as you keep it within 100 feet of you when on public land. The trick I found was to bait them with chunks of hot dog. When I used bread the darn bread floated which allowed the fish to eat it from outside the trap. Hot dog sinks so they have to poke around till they find the hole.
 
#14 ·
There is some ambiguity on the code though. Does it include hand held aquarium type nets? What does "a long handle" mean? That's in the Comar definition of a dip net. My thought though, is better to be safe than sorry.

Good info on the traps. I never tried hot dogs. I guess I probably thought that I'd eat them on the way to the creek and all that would be left would be bread! :laugh2:

By the way, regarding the streamhealth link of the map. If you click on any of the dots on the colored coded stream, you'll see a link titled, "more". If you click on that, you will get the species that they collected during their electroshock sampling sessions. They usually mention the year. Some of the dots don't have fish collections, same with the triangles, but most of the dots do have them. Also, if you click on any of the fish links in the results, it takes you to that species page, where you can see a range map in the state.
 
#15 ·
By the way, regarding the streamhealth link of the map. If you click on any of the dots on the colored coded stream, you'll see a link titled, "more". If you click on that, you will get the species that they collected during their electroshock sampling sessions. They usually mention the year. Some of the dots don't have fish collections, same with the triangles, but most of the dots do have them. Also, if you click on any of the fish links in the results, it takes you to that species page, where you can see a range map in the state.
I noticed that as well. Took a bit to figure out because if you click on the dot... but not 'enough' on the dot. It just highlights a section of the stream the dot is on and tells you essentially nothing. Le sigh, government websites....

Anyway it tells me a LOT about species spread. I for instance had no idea that american eels are basically everywhere. I would be tempted to try and find one and keep one but I have read too much about how terrible they are in the aquarium ;P
 
#17 ·
That is a very cool background wall you've built. My husband has a mineral and fossil collection, we have a few crinoid pieces (some self-collected) your use of the spring looks fairly realistic! Looks like a lot of work to build that- can't wait to see fish in it. Does look like it takes up a fair bit of space in your tank? I'm a bit surprised you made it so thick! I didn't know drylock was safe for use in tanks- I've used it on exterior retaining wall for my garden, never thought it could coat something in a fish tank.
 
#18 ·
That looks fantastic and so much better than the one I did years back (I believe a thread on that exists, but all the photos no longer are hosted). I went much thinner, and eventually ran into floating (and break off) problems. I did mine on the actual aquarium back and it didn't adhere like I'd expected. One day, the whole thing had come loose and was trying to float to the surface. The aquarium frame is the only thing that kept it from just being on the surface. Turned into a big mess that required a full breakdown to scrape the foam off. But I think you may have avoided that possibility by simply using SO much material.

I always wanted to try it again, so subscribing to this thread. Look forward to seeing your progression.
 
#19 ·
minorhero, I was worried that the site wasn't that user friendly, because of the problems that you detailed, and wanted to make sure that you were able to get what you needed. I'm glad that you figured it out though, because the sight has been very useful for me. I really love that you can find more recent samplings, at certain creeks. Of course, their limited to the amount of manpower available and funding resources, but, still interesting. The funny thing is that they revamped the site not long ago, and prior to that, you didn't have to be so precise with the dot, and clicking out side of the dot got you nothing. If you ever get a chance, the Glen Echo Park Aquarium, public with a small fee, is worth a visit. If you can time it to meet the aquarist there, he can give you tips on how they keep their eels. They've kept several of them. When collecting for my oyster reef tank in the Bay, I sometimes catch small ones. They have to be 9" after a certain time though to be legal unless you have a scientific permit, I think, but don't quote me on that.

Thank you very much Ken and JJ. One day I'll post a lessons learned type thing after it's been in my tank for a while. It is very thick. I wanted realism in the rock, and I think that if I had to do it all over again, I could cut it back a couple inches in thickness. I'd never made a background or worked with styrofoam before, so when I was building it, I didn't know what to expect. The tank is 75g, but after water displacement, is probably more like a 55g now, LOL. But, that's OK with me because it will always house small minnows, dace, shiners and darters.

Thank you Blue Ridge Reef. I will always worry about this background coming loose. I think it will be OK, but, the fear will always be in the back of my mind.
 
#20 ·
This past weekend, between fishing trips, I made some progress on the 75g stream tank. First, I drained the tank, took out the rocks, scooped out the gravel and cleaned out the silt. When I put the gravel in the first time, even though I sifted it for a couple hours while running a hose through it, it still had a bunch of silt in it.

When everything settled, the silt created a layer of scum that covered everything, including the roots and wall. It actually looked like what you'd see in a real creek. But, I cleaned it off with my hand and a sponge and cleaned the glass as best I could. Some of the silt made it's way into the crevices of the rock wall and root. It actually looks pretty realistic, so I may or may not try and clean them out. I'll wait until I fill the tank again.

I took the gravel and divided it up into two buckets, and decided to clean half at a time. It took me three hours to clean the first half, and it's not perfect, but much, much better. I think that I'll divide the other half in half again, and clean each of those 1/4 amounts one at a time. Maybe it will go faster.

Once I had everything out of the tank and finished cleaning the scum, I put the roots back in, measured where to anchor them, and zip tied them to the stand pipe (picture below). It's really secure now, won't budge, and certainly won't float again. The stand pipe is wedged in there tight to the tank and secure in the wall. I'm really happy how it turned out. There is plenty of room for my standpipe and over the roots current.
Image


If I want to do maintenance to clean out the stand pipe, I need to remove the roots. The zip tie is easy, just cut, take the roots out, clean the standpipe, put everything back together and in, and then use another zip tie. Easy peazy.

After that, I put the mostly clean gravel into the tank, then snapped a pic. Under water, the glare from the epoxy completely disappears. This is the first pic with the new light fixture:
Image


Next steps this weekend (hopefully, I can get them all done)
-wash the rest of the gravel and put in the tank
-redo the rockscape
-fill the tank and reset the circulation pump
-redo my spray bar for the canister filter
-set up and test the canister filter

The only thing else after that is to buy a glass top, cycle the tank, and then catch some fish for the tank.
 
#21 ·
I was able to pretty much finish the stream tank. I finished washing the gravel as best that I could, added it to the tank along with the river rocks that I collected, and rockscaped the tank. I'm not certain that I'll keep it this way. More than likely, I'll remove some of the river rocks. I kinda got carried away LOL. I also purchased a glass top that didn't fit correctly. But, it worked out, because I was able to trim the plastic pieces that come with it to make up the difference and give it a good fit. All I need to do with that is cut a couple of the corners to make room for the canister filter stand pipe intake tube and the spray bar. Oh, yeah, and I finished the spray bar. Once I get the glass cut, then I'll set up and run the canister filter. This should bring the river effect into full swing, adding current across the top of the roots and across the tank. The roots are cinched down tight and are doing their job well, hiding the powerhead.

Next up, cycle the tank, then collect and add fish.

Below are a few pics.

Front View:
Image


Front Left Side:
Image


Front Right Side:
Image


Front View Sunset:
Image


Here's a video:
 
#23 ·
Thank you so much! My plan is to stock it with rainbow, fantail, greenside and tessellated darters, along with various minnows, dace and shiners. Of those, I'd love to add satinfin shiners, rosyface shiners, rosyside dace, and silverjaw minnows. But, I may add more depending on what I catch. For example, just about every stream around me has blacknose and longnose dace.

Sculpins are out as they'll eat darters. I am on the fence about adding a small sunnie. Maybe if I catch a long ear... But, I won't add one right away.

As far as plants go, I want to get some river stargrass. I read that it does well in aquaria, is easy to maintain, and is a nice looking plant.
 
#27 ·
The stream tank is completely done, ready for fish. Here's a video below. I still need to cycle it, but not a problem. I installed the canister filter and spray bar, and it is working just as planned, shooting current over top of the roots and across the top of the tank. The powerhead is hidden behind the roots and shoots current through the roots. There is an eddy effect, which is what I'm going for, so I'm happy with that. I also pulled a lot of the river rocks out, keeping my favorites, and I added a couple pieces of shale that I collected from a fossil site along a tributary of my river. I layered the rocks so that it appears that some sluff off of the wall (as Andy and Matt suggested) and will add a couple more soon. I have to dig them out of my fossil collection, LOL. I also have a preview of my sunrise to sunset feature of my light.


Bump: The stream tank is completely done, ready for fish. Here's a video below. I still need to cycle it, but not a problem. I installed the canister filter and spray bar, and it is working just as planned, shooting current over top of the roots and across the top of the tank. The powerhead is hidden behind the roots and shoots current through the roots. There is an eddy effect, which is what I'm going for, so I'm happy with that. I also pulled a lot of the river rocks out, keeping my favorites, and I added a couple pieces of shale that I collected from a fossil site along a tributary of my river. I layered the rocks so that it appears that some sluff off of the wall (as Andy and Matt suggested) and will add a couple more soon. I have to dig them out of my fossil collection, LOL. I also have a preview of my sunrise to sunset feature of my light.

 
#28 ·
Well, no aquarium project is completely finished until it supports life, and in this case, fish. I had a little time late on Sunday to get out to a creek that is only 15 minutes from my house to catch a few fish. My goal was to collect a few minnows of any time, and if lucky, a couple darters. So, I gathered up my hip boots, a bucket, and my net, and headed to the creek.

After about a quarter mile hike, I got to the spot that I wanted to collect. I had about an hour or so before the lost of daylight. I walked the creek bank for a bit and didn't see any fish at all. Either the fish weren't there, or the cold weather had them all hiding. I wasn't sure if perhaps they migrated out of the creek and into the river or were still there.

I climbed into the creek and tried kicking up leaves and, sure enough, the first fish showed up in the net, a small eastern black nosed dace (Rhinichthys atratulus). It was tiny, and I didn't want tiny fragile fish in a new tank. So, I kept disturbing leaves and eventually, found more larger fish of the same species. I kept five of them for the tank. I moved from pool to pool disturbing rocks and leaves with my feet, but, no darters.

So, I decided to start turning over larger rocks with my hand. So, I rolled up my shirt sleeves and began to work. I turned over the rocks, used my other hand to scare anything underneath into my net, which leaned precariously against my leg. After a few rocks, finally, a beautiful male rainbow darter (Etheostoma caeruleum)showed up in my net!

I was so pumped, what a beautiful fish. I should have taken a picture then, but, my phone was in my jacket on the creek bank a few pools back. It was very dark, and his orange/red fins were stunning. I kept turning over rocks looking for a female companion for him.

After a few more rocks turned over, another darter showed up in the net. At first, I thought it was a female, but, on closer inspection, it was a different species. It was a fantail darter (Etheostoma flabellare). I tried for a while more, working down each pool with no more success on darters. I caught a sculpin, but released it, along with several more blacknose dace. Since daylight was ending, I called it quits, happy with what I caught. Not just happy, elated!

I took the fish home, stuck an airstone in the bucket and let it alone for about four hours, so the water temps would warm to room temperature in my basement, about 64 degrees. The creek was quite cold, so it took a while. I tested a few parameters of the creek water and they were very similar to those of my tank. After that, I netted the fish out of my bucket and released them into my tank.

Within an hour, the dace and fantail darters were exploring the tank. The rainbow darter hid and sulked for a long time, perhaps more than two hours before coming out to explore. I fed a few flakes to the dace, and they ate. I didn't expect the darters to eat the flakes, so, I tossed in some blackworms. The fantail darter ate some immediately, as did the dace. The rainbow darter had no interest in food yet.

Last night, I came home from a fishing trip and rushed downstairs to observe my new fish. All of the fish were happy, doing what they do. The darters explore every nook and cranny in the tank, hunting for food. I fed them flakes again first, thinking the dace would get full and not eat the worms. I learned that they are never full.

I dropped in some blackworm with a turkey baster, target feeding near the darters to make sure that they got at least one worm to eat, and that worked. Both darters ate them with gusto. Success! The fish are feeding already, and seem happy in their new environment. I marveled at the personality of both darters, and the brilliant coloration of the male, not yet in breeding colors, but still amazing that fish like that live so close to me.

I put together a video of the clips from the last two days, showing the tank with fish. I hope you enjoy it!

 
#29 ·
Nice find on that rainbow darter! I definitely want one of those guys at some point though I also like snails a lot so ... maybe not anytime soon.

I also went collecting this past weekend. I was on a mission to find mountain redbelly dace and did, after much work, get 1 of the little fellows. He is currently swimming around with my blacknose dace in my quarantine tank. I agree with your assessment that dace are always hungry, even when spooked from being caught in a net for the first time they will happily chow down on whatever is in front of them.

I also caught 3 juvenile sculpin this past weekend and kept all 3. They are pretty nifty looking though long term I doubt I will hold onto them all. Same for some northern hogsucker I caught and misidentified till I got home ;P
 
#31 ·
I wound up collecting more fish from a local stream about 40 minutes from my house for my FW stream tank this past weekend. This small stream has been one of my favorite smallmouth bass fishing spots over the years. It has a wide diversity of fish species, as much as any stream in the Western part of Maryland.
Image


There are a couple species that I still want, but, for the most part, it's fully stocked now. I also found a beautiful red rock that I just had to put into the tank. I'm trying to find at least one rock to add to the tank from each fish collecting site. This tank is a Potomac River biotope tank, minus major predators.

The species below are currently in this tank:

Darters:
Rainbow Darter (Etheostoma caeruleum)
Fantail Darter (Etheostoma flabellare)
Greenside Darter (Etheostoma blennioides)

Minnows, Shiners and Dace:
Eastern Blacknosed Dace (Rhinichthys atratulus)
Spottail Shiner (Notropis hudsonius))
Silverjaw Minnow (Notropis buccatus)
Longnose Dace (Rhinichthys cataractae)
River Chub (Nocomis micropogon)

Here's a short video of the tank and the new critters:
 
#33 ·
Thank you so much andieg3!!!

Here's a video of the new fish in the tank, now that they're acclimated. They're all so bold, not afraid of me when I clean the tank. They even try to eat the hairs on my arm when I clean algae off of the glass. In this video, I feed them blackworms using a turkey baster. I fed the minnows and dace flakes first, so they wouldn't pig out on the worms. Some of the fish are starting to color up more as well. I had 24 minutes of video clips at first, so I had to trim off 14 minutes of it to keep it from being too long. It was tough cutting out some of the scenes for me. Heck, I stayed up way too late last night watching these fish as it was. I'm so addicted to this tank. I hope you enjoy this video as much as I did making it.