The Planted Tank Forum banner

First Attempt at a Dutch Aquascape!

7.3K views 24 replies 5 participants last post by  Phil Edwards  
#1 ·
Hey planted tank people!

Ive gotten back to some forums recently so i thought id start a journal for my most recent set up!

DAY 1

Ive always loved the look of a dutch style aquascape. I like how the scape is directly related to the health and quality of the plants youre growing and theres no real features taking away from the plants! I felt as if it would force me to really dial in this set up and improve my plant growing skills. This will be my second tank after making the switch to high tech but my first real go at an actual scape with the co2 set up so here goes nothing!

*disclaimer* This tank has been up and running about 6 weeks now so ill post a few different post to get up to date and then plan on weekly updates!

My plan for this aquascape was to lay things out ahead of time and stick to the plan as best i could. I also really enjoy the DIY aspect of this hobby and try to build what I can when I can save a buck or two! Lucky for me theres a strong local community of planted tank people in MN so I find a lot of my plants and equipment used/from other hobbyist. With that said I traded plants and a 20L for a sparkling like-new 40B and built my own stand from 2x4 I already had. Ive buit a few stands now and go off the King of DIY type stand. Still havent stained it and put on the doors but i think it looks alright so far.

As far as planting, I took inspiration from any and all pictures of dutch scapes I could find online and selected plants based off of what I had and what I could most likely find without going online. I decided on the plants I wanted to use first, and built my scape around the plant choice. Being on a budget I like to use what I have and fortunate for me I had to tear down a 55g before I could set up the new tank (gf gets to decided wheres things go and I get two tanks in a small one bedroom apt :grin2: ) Anything i didnt already have I attempted to locate locally which ultimately got me to about 75% of the plants I wanted. One of my favorite LFS finished me out with a few pots of plants i added around day 15, but you'll see soon enough!

Here are the basic specs of the tank!

Size: 40 gallons
Substrate: Miraclegrow organic potting soil caped with pool filter sand. I also used crushed lava from as a base layer to create a slope back to front to give the background an extra hieght boost.
Lighting: 50W LED floodlights off of amazon x2 (note: these suckers are BRIGHT but the spectrum is a bit yellow for my taste but i got them on sale)
Filtration: Marineland C220 Canister Filter
Pressurized CO2 injection and I diffuse through a small power head.
No livestock to start except pest snails

Planting List (L-R, B-F):

-Background-
Hygro. Angustifolia narrow leaf
lud. repens x arcuata
bacopa carolina
lud. arcuata
purple cacomba
ammania senegalensis
rotala rotundifolia
-Midground-
*mixed group of crypts-*
wendii, wendii red, tropica, spiralis, wendii bronze
rotala macranda mini "pink"
red tiger lotus
java moss
pearl weed
lud. peruensis
stargrass
alternanthera reineckii
blyxa japonica
rotala sp. H'ra
golden nesea
lud. sp. 'red'
-Foreground-
dwarf sag
crypt affinis 'metallic red'
monte carlo
staurogyne porto velho
hygrophila pinnatifida
hydrocotyle japan
multiple unknown type of buce

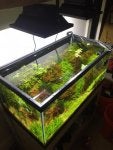
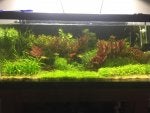
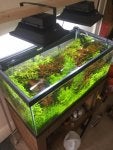
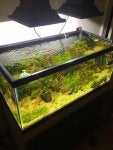
When it came down to actually plan the layout I simply used what I learned from many hours of research, a pen and notebook. I started with general areas of where I wanted certain plants, and then filled in spots based off of contrast in color, leaf shape and leaf size. This was almost like a jigsaw puzzle trying to find the perfect spot for each plant. Now a few weeks planted there are a few changes I need to make and a couple things I cant believe I didnt see when originally planting! After a couple rough drafts I had a good idea how I wanted my layout and I was ready to set this bad boy up!

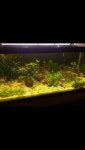
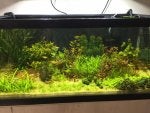
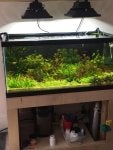
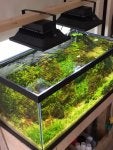
attached is my final layout sketch, the tank right after set up and a FTS. I was using a combo of a few lights initially until the new LEDs arrived.

thanks for reading and ill have more updates soon!
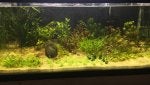
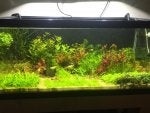
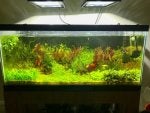
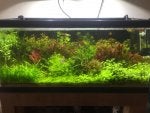
 

Attachments

#2 ·
Hello again!

Thought i would write again and share a few more details about the tank and my set up process.

I really debated either shelling out the cash for some good planted tank substrate or sticking with old faithful, Miracle grow organic potting soil (MGOPS). Obvious pros and cons here, amazonia soil kick kicks a** but ive actually never used it but it costs an arm and a leg for lager tanks. I figure because im focusing on the plants in this tank and am not using any hardscape, save the fancy stuff for later. Dirt has pros and cons as well. Ive set up a a hand full of tanks with it and always had good results, I mean its dirt and we are gardening arent we? lol but the biggest issue with me is how careful you have to be when removing plants and general maintenance. Nothing says algae bloom in high light like an ammonia spike and a bunch of organics floating around in the water column. BUT because the goal of this tank is to make a plan and stick to it, Ill be trying not to move much once the tank is up and running.

So MGOPS it was! i like small gravel but a 50lb bag of pool filter sand is hard to beat and I had an extra bag from my last project. Laying things out I put down about an inch of crushed lava rock on the back half of the tank, to start giving the substrate some slope. Besides the sloping effect, its also added biological material (maybe?). To prevent air being trapped when i flood the tank i sprayed each layer down before covering it and filled the tank VERY SLOWLY. Anaerobic pockets have cause me issues in the past so lets not repeat! i filled in the lavca rock with about 20 lb of old eco complete just for inforce the slope.
Next came the dirt! normally im a big fan of mineralized top soil. I wont get into the dets here but basically it wont leach as much into the water column like most freshly dirted tank do in the beginning. It was winer in MN when i was setting his up so i didnt have the time, space or weather to mineralize new soil so just went straight dirt. I also did not sift or strain the dirt except for obvious large pieces of stuff. ive heard overall it dosent make a difference. About an inch layer. I compress it with my hands a bit to get a nice compact dirt layer. *one inch packed down* also remember i spray everything down before the next layer.
Then pour in your sand! I used just about a whole bad and added a little black sand initially on the bottom because I didnt want to run out. Then sprayed the hell out of it with my cheapo spray bottle. why didnt I just fill it? then you get those floaty little bits of sand and blah blah believe me, just fill your tank as slow as you can tolerate lol.
I continued to fill the tank and proceeded to do about 3 80-90% water changes back to back to back right away. this will really help with any leaching nutrients and organic matter. algae fest just waiting to happen.

Next step planting!

no need for much details, pretty standard planting. use my tweezers to stick them down into the dirt. really dont be afraid of betting plants down into the substrate. The first day i planted about 50% because its only the plants I already had. The weekend after I traded a bunch of extra plants for a lot more stems and went to a local auction (super good timing). overall this put me to about 80% planted. dont have a picture of the tank at this phase.

Next post ill skip to the two week mark when im just about fully panted and have the new lights set up! the tank finally starts to look like a planted tank and the growth begins! ill try to update this evening with more pictures!

happy tanking.
 
#3 ·
Hey there. Welcome to The Planted Tank! I'm not going to say much here because I'm going to direct you to the guide to Dutch Aquascaping in my signature. It's an article that was recently written by Bart Laurens this years' NBAT National Champion. He kindly gave me permission to link to it and explains authentic Dutch aquascaping better than I ever could. I mean, he's the Dutch (as in the country) champ after all. I hope the article will help you as you go forward with your aquarium.

Happy gardening,
Phil
 
#5 ·
Two weeks in!

Day 17

Hey guys and gals,

Since the initial flooding of the tank, a lot has changed! like i mentioned in the earlier post, some additional planting was added between days 1 and 17 with everything being added by 17. The only thing i added was a bunch of buce to the front right corner as a temporary foreground plant until i figure out what i want there. this tank is also my first attempt at at a true "carpet" with Monte Carlo, in addition to the dwarf sag, buce and hydro japan. Ive used the others before but only low tech tanks.

the other major change was the lighting. originally i had 3 fixtures on the tank ranging in size and quality. this was literally every fixture i had and really wasnt that bright. I knew it would be temporary. Somewhere after week 1 the new LED floodlights came in the mail from amazon! The brand I tried is "LEDMO LED Floodlights" 25W. Supposedly, they were 6500k but the reviews adn what not clearly showed it was much closer to the 4-5k range being a bit yellow in the tank. the longer the tank has been set up the more ive gotten used to the lighting. not ideal but the loights are really strong and have been producing so far. Im a fan of pendant style lighting so i already had some brackets in the wall to hold the lights from my last tank so i just went with them. the lights started about 18" above the tank, dropping them a few inches each week. Currently i think they are about 12" riased off the tank and im not sure how much lower ill go.

the tank was really slow to get going, i get the co2 and ferts on the low end during the transition and initial set up to reduce teh change of algae and its worked prety well so far. no major algae issues as of week 6! the usual diatoms were expected and handled with water changes and good maintenance.

Quick stats fo the tank up to this point,

lights running 3 hrs, 4 hours break, 3 hrs on (will increase to 8 hrs total)
co2- 2-2.5bps
ferts- dry dose half of recommended EI with minor N dosing while the tank is still leaching
livestock- impulse buy on a breeding group of real nice red delta guppies. thought they would keep the cycle..
weekyl maintenance of 40% wc and deep vaccuming around plants.

speaking of cycling, I used my cyclced filter for this new tank and gave it about a week before added the guppies. it was fully cycled by then and i did all my testing just to make sure!

here it is as of day 17! stay tuned for more!
 

Attachments

#7 ·
yes the dutch one? if referring to that one yea it was fantastic! I like to think ive done my fair share of research but that article something else! never knew they judged in person for aquascaping contest! also made me realize even more changes i want to make in terms of plant selection. If all my reds fill in then itll definitely be too much!
 
#8 ·
quick update

Day 19?

Morning!

So im currently away from tanks on a work trip and journal is turning into my little escpae to my "metnal tank" and at least talk fish stuff here on the forum. Always fun to tank plants with people! Anyway heres another picture, this was taken a day or two after the most recent update, only real change is I finished off the foreground with my buce collectiion. Still not set on this as long term but i couldnt help putting the buce back in high tech. By week 5 I have two flowers going so stay tuned for some serious progress. Rember this tank is currently 6.5 weeks old on 3/15/18 so this is a "previously on the dutch scape" post until im back home from work! Itll be over 3 weeks of me away and my gf taking care of the tank. Ill post undate when she does her one and only water change+trim of her being in charge. lol

aaaaannyway i added the buce and there might be a bit of growth on the back stems but as of this point things were still settling in and growth was average/ still dialing things in. around week 3 I tweek my dosing and increase co2 and we see a significant change! more to come!

cheers!

Bump: oops forgot to attach
 

Attachments

#9 · (Edited)
Have you considered making a back wall out of foam and attaching the Buce to that?

Some various walls I've made. The first was eggcrate filled with spray foam and the second was just the thin pink insulation foam. It was a bit of a PITA to build, but it held staples really well. I stapled 25 or so Anubias nana 'Petite' at the top to give me space to have shorter groups, yet still have plants as the Dutch do.

Image


Planted about 6-8 months later
Image


225 custom with Anubias nana on the left, Java Fern on the right, and Anubias nana 'Petite' just starting on the back. This was just painted foam jammed under the rim and held in place by the substrate. The eggcrate wall was siliconed on.

8 or so months of growth on the walls
Image
 
#11 ·
I really dig the final results of the planted walls. i was thinking about how i was going to do that! I could probably incorporate something like that into the sides. or else i pennywort seems to be really common to cover up some sides and dosent look have bad high tech. I love tinkering and building stuff with my eggcrate (already have some!!) did you have to do anything to the foam insulation piece? the second option you referred to


also awesome article on the barreport! saving all these links when im really dialing in this new tank!
 
#14 ·
All I had to do was paint it with black Rust-O-Leum. Make sure to use the kind in the can. Spray will melt the foam. You may need to tack it to the glass with some silicone. I can't see pictures of your tank while replying and can't recall if it's rimless or not. If it's got a rim, just glue it to that and you're done.

Regards,
Phil
 
#12 ·
Check out AGA Dutch for some cool scapes. I am competing again this year, and it really helps to see dutch and look at the specific rules. Try to form more lanes and "streets" in the scape. Sloping the substrate upward toward the back helps a ton with creating the illusion of depth. Try to cut down the number of species as well, dutch tanks generally limit themselves to one species per 4" of width. In my 55g, I only had 12 or 14 types, and I plan to have a similar number in my 75g.
 
#13 ·
ive been all over the AGA website! Its great seeing the top tanks but I also like scroling throuhg the other entries and ready any comment left by the judges. I agree the more im reading about "true" dutch aquascapes aka following all the competition rules, i realize how many of them im breaking lol. When i get back to my tank theres already a list of plants getting pulled to open up more room and focus my attention. I guess i have a question about the streets used in the scapes. Are they more referring to a long street throughout the whole layout or one plant group making a "street". I frequently saw judges making comments about beginner tanks lacking a street aspect and I wasnt 100% sure on appraoching it. My attempt at it is oing with the pearlwee (middle left) leading the eye to the monte carlo in front and a really nice bush of hydro japn on the right? its hard to visual with the pictures ive uploaded. things are a lot more filled in currently.

thanks for advice!
 
#16 ·
Maxarko,

I would strongly, strongly, strongly recommend googling Willem van Wezel, Raymond Duindam, and Bart Laurens. Those three have consistently ranked highly, if not been district and National Champions in the NBAT, authentic, real, Dutch aquascaping competition. Those are the photos/tanks you want to be emulating if you're looking to do an authentic Dutch aquascape. There are very very few people in the US who I would consider have Dutch aquascapes good enough to emulate. The article by Bart that is linked below has some excellent visual examples as well.

Now, if all you're really looking for is a tank with well grouped plants with some contrast and elements of Dutch aquascapes, you'll be able to find those in abundance, but they're not true Dutch aquascapes. They're beautiful planted tanks and aquatic gardens, but they're not Dutch.

Kind regards,
Phil
 
#17 ·
Thanks Phill with the consistent feed back! As im coming to better understand a "true" dutch scape i fealze how far away I am from one of those masterpieces but its ideally what I wan to one day create. Its all a learning process right? hah Im already so in love with the style, learning more about it is really driving home my decision to learn the dutch way. thanks for the advice!
 
#18 ·
Day 26 update

Hello again!

Things are looking better in the scape!

I was having trouble determining if my lights were THAT yellow or I needed to do more water changes to help some leaching from the dirt.. well definitely more leaching than I thought. Started doing at least 50% WC a couple times a week to clear that up and it really has made a difference for water quality and plant growth! I try to do wc after lights go off or right towards the the end of the period. not sure if it really makes a difference with ph swings and what not but the guppies dont seem to care. (using moderately hard tap water)

Up to this point ive been doing daily water testing trying to dial in my dosing regiment and ive really started to see a difference in growth after a a couple weeks of slight adjustments. Nitrates have been creeping up which i attribute to the ei dosing and leaching. water changes have helped keep it a bit lower. I use your basic api test and dont really shoot too specific but 15-30 is what i would like to see day to day. I have slowly reduce my dosing of KNO3 and upped PK a bit. Im guessing this wil change slightly over time as the plant mass changes and leaching from the dirt lessens but im trying to be a tank hawk so hopefully i catch something at the first sign of a problem. I had some concerns about some weird growth and attributed some crinkled growth to co2 issues. upped my co2 over the course of week 3 to about 3.5bps maybe a tad higher.

Still a few plants that are taking a bit longer to adjust and grow steadily but overall improvements across the tank! I seem to always forget to get pictures before I trim so a few plants that seem oddly short were most likely trimmed before the pic.

Thanks for reading!
 

Attachments

#19 ·
Quick Update- Day 32

Just wanted to dump some more pictures of the tank for all you picture junkies >:) not much change just for some growth across the board. The tank at this point is adjusting well to a tweek in co2 and dosing. (but nor for long)

Currently, sadly I just discovered a staghorn algae outbreak while facetiming with my girlfriend.. Im assuming it was overfeeding on her end and maybe an issue with nitrates bottoming out. A full "current" update wil be coming shortly as soon as this thread is up-to-date. Ill probably have a few more posts until we get to that point and im back home with my tank.

thanks for viewing!
 

Attachments

#20 ·
DAY 42 Staghorn Algae Attack Plan

Hello everyone!

As i mentioned in the previous update, while checking out the tank during a video chat with my gf I saw what appeared to be some sort of algae. I knowingly used some plants with some remnant staghorn algae so that was my first guess. After going through the check list on the algae we determined it definitely was SH. (more difficult when youre not there in person and through grainy video lol). All of a sudden my gf realizes what im referring too and says iyts all over most of the foreground, mostly concentrated on the monte carlo. boo. here ive been getting picture after picture thinking she (the tank) was looking good without getting a chance to look closely at the details. Man being away from a tank this long (23 days) is no fun. I had her do manual removal each evening since, upped the water changes to 3 times a week to take care of any past over feeding and tweaked my dosing. As mentioned in an earlier post I initially was having troubles getting my nitrates at a steady level without them going super high. Right before i left on my trip I thought i had them figured out and was dosing KNO3 at a lower level to compensate for leaching from the dirt. Well now that the tank has had a few weeks to adjust to that dosing regiment, Im pretty confident that my N:p levels were way off, in addition to an assumed ammonia spike because of overfeeding. These assumptions were made off of my past experience dealing with SH, recent research since discovering the problem and what my gf has been telling me of her ACTUAL maintenance since ive been gone :nerd:

**Any advice and constructive criticism is always welcome, especially if youve had a surprise invasion of staghorn algae due to neglect (lack of weekly maintenance)**

Im hoping that the increased water changes, manual removal, adjusted dosing (more N:p:K but also different ratio) and bi weekly Glut. spot treatments will take care of the rest of the algae. In real time i think i discovered this algae problem at 3-4 days before this post and thus far, she reports no new algae visible, whats left has been dying (turning pink) and plant growth seems good. Another observation i thought was a big clue was there was only algae on the slower growing plants.

The picture posted is the last one sent me to me before I noticed the algae, its definitely all over in this picture but without being there in person and having a higher quality picture I just thought it all looked fine. At least the tank has really filled in! Cant wait to do a HEAVY trim when i get back home.
 

Attachments

#21 ·
Looking good so far! The grouping's getting a bit better as well. Sorry to hear about the algae, but it's just part of the process. If the plants aren't too invaded by the staghorn, I'd recommend letting them all grow up as much as you can without impeding flow too much then trimming them down hard. I've found that to be a good way of helping recover after getting rid of algae instead of trimming right away. If you're lucky you'll then have a bunch of nice big, clean, stems to replant too.

Great choice of fish. They look great in there.

Keep it up!!
 
#23 ·
Day 60 update!

Hey planted tank people!!

Im finally home from my trip and man its nice to be back! Came home to a fish tank that looked a lot better than expected and a lot of work needed!

Start with an update on the staghorn algae. pretty much gone in the tank after raising the lights two inches, reduced feeding, increased macro dosing (adjusted ratio of npk) and dosed 5 ml of straight glut. a few times a week. For the msot part this treatment worked and the only real problem area left was on some of the monte carlo carpet. I soon took care of the rest of it with a good hard trim across the tank and a deep clean. I always laughed at aquascapers who have 5 different pairs of scissors but after trying to trim MC with long straight scissors i realized how nice curvy pair would be lol. (tax return??) I started the maintenance with trimming any left over algae infected leaves, followed by a heavy trim across the board. actually took a lot longer than expected but who dosent love mowing down a tank in need of a good trim?

within the next week im going to start the process of removing a handful of plants and start working towards of a true dutch scape. Now that things are pretty filled in and growing, I feel more comfortable pulling some plants and changing things up! Im scared to uproot all that dwarf sag but oh well it must be done! Ludwigia Peruensis is still my favorite plant in this tank. the stems are so much larger than i was expecting and truly is a beautiful plant to keep. Really enjoying this tank and how its starting to mature!

My co2 died out a day or two before my return so i have some crimpled growth on some plants but otherwise its steady as she goes for here on out. Ill begin weekly updates and maybe ffer stem packages if anyone would be interested. (not sure if thats allowed on here).

thanks for looking!

Cheers!
 

Attachments