The Planted Tank Forum banner

My hair pulling and costly UNS 60S Shallow tank.

1 reading
9K views 12 replies 6 participants last post by  S Verma  
#1 ·
I bought this 10g 24" by 14" by 7 high tank at my local fish store. I had no clue as to what or how I was going to plant this tank. No vision what so ever. That was my first mistake. It's an odd size to work with. It can accommodate various styles. I googled and Instagrammed tanks of this size to get an idea. People were doing some amazing things with plants growing emersed but since I had never done that kind of tank before, It became somewhat of a daunting idea. Instead.. I had some wood I had bought to use in future aquascape projects so I decided to work with those pieces of wood. This was the first scape I came up with that I seemed somewhat happy with. It gavee me an idea that I could use a mostly Buce and Anubias type tank with some moss. Keep it a low tech tank.
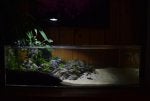
The idea was to use a sand substrate and have all the growth on the woodwork. Since I wanted a low maintenance tank I decided no co2. I thought this was going to be a good start so I went about getting it ready. I ordered some Buce and moss. I already had a few Anubias plants and purchased about 10 lbs of serui stone use so off I go. This was how it looked over a month ago.
My next step was planting the moss and plants, fill with sand.
 

Attachments

#2 ·
Now lets get it planted and figure out the lighting

I spend a few hours planting the mini christmas moss, buce and various other plants. added sand and filled with water. I did some research on lighting and since I wanted an open tank, I ended up buying this LED grow light at Home Depot. I read the reviews and they stated that it was the best LED grow lamp that looks like natural sun. I bought some bookshelf brackets to hang from the wall so I could mount the light right above the tank and be able to adjust the height. The light didn't in fact have a natural sun look. It was way brighter than I expected it. So bright in fact, it lit up my whole room this pinkish purple color. I also decided to add CO2. Even though the plants I chose didn't really need co2, I figured the benefits are too good to not use it. I already owned a CO2 unit not in use so I figured why not.. But that fricken light. I just couldn't do it. Not to mention the heat output in my little office would start to cook me in no time. So back to Home Depot I went. Even when I returned the lamp, it was still hot to the touch after an hour in the box. I was so obsessed with the lighting that I hardly payed attention to the planting and how it looked.. The exact opposite of the idea I had in my head. I had issues with my Nano Lilly Pipes fitting such a shallow tank. Let alone where I was going to place my co2. Everything looked like crap and nowhere near the idea I had at the start.

Bump: So I had two desk lamps and wanted to try these new cree bulbs everyone is raving about. I popped off the tops of the light bulbs and went to setting everything up. Still not addressing the lilly pipes or the co2. One thing at a time!
 

Attachments

#3 ·
New beginnings..

At this point I was very frustrated with the way the whole project looked. With a tank this open, it deserves a clean look. The lamps and where it sits near my desk was just cluttered and messy. Why did I have to buy such a wide and shallow tank again? I wasn't happy with how I planted the tank. It looked very amateur and haphazard. It looked out of place in my small home office.
I have a den in my mid century modern house that has this excellent cabinet that we don't use for anything but storing vinyl records. I decided to give her a surprise and move the tank upstairs and near this walkway. If I kept it clean looking and not cluttered with gear, it would look awesome. So I drained the tank and scrapped the wood and sand idea. Instead I thought I would go for more of a river bank style with a fallen branch that would stick out of the water. I really wanted to pull this one off as it's a room we both spend a lot of time in and I wanted her to like the tank and not think "great, his hobby is going to take over the house".... I wanted to use only one of my lamps and keep it planted mostly on the left side. These cree bulbs that cost a mere $9 are pretty fantastic for output. They come in at around 5000k so good enough for plant growth. The color output is not really what I had in mind however as it still seemed a little flat. But oh well, it should work.
 

Attachments

#4 ·
The branch that broke the camels back

I left the scape up for a few days. I tried every which way on that Manzinita branch. I even cut it up to smaller pieces. I posted an image elsewhere on the net and was told the bark would fall off over time. I googled how to remove the bark. It involved me baking it at 200 degrees and then blasting it with my fairly weak pressure washer. Bark still stayed on. By this time I had had it with the damn branch and I removed it. I went back to my LFS to buy more serui stone and had a better idea. I would do a 50% left side planted and leave the right 50% like a sand beach. i wanted a bit lighter sand so i ordered a bag from amazon. The sand arrived so I went about rinsing it in a bucket. Damn, this is the finest granular sand I ever seen. Positioned the plants and rock. Added the sand....................... What the hell kind of sand is this? After flooding the sand, I realized it didn't look like sand. Instead it looked like I whipped up a bunch of butter and smoothed it out for the substrate. It looked like dough! Bottom line, it didn't look like sand. I hated it. Once again, this tank didn't resemble anything I was trying to go for. I started to hate the lamp and felt it took away from the shallow tank. The colors are ok but not what I wanted. My wife was coming home in 6 days so I still had time to get it presentable. I read a bunch of reviews on goosneck style lighting and settled on the Kessil A80 since it has a 24" throw that would be perfect for this tank. Plus the color renditions are supposed to be right up my alley for what I was looking for. I went back to the LFS and bought more serui stone, carpeting plants and a few midground plants I could throw in the back.
 

Attachments

#5 ·
Finally!

After getting all my stone, carpeting plants and the light in place I came up with this. While it wasn't my original vision, I felt it turned out to be better. The lesson I learned is to let the plants, stones and gear help determine what you're going to do. Try to be flexible and definitely don't make rash purchases. I will post more pics as the carpet grows in and when I add livestock. Wife came home and loves the tank. The Kessil light was my best purchase so far. The color and shimmer really makes a difference. I will keep this journal updated as time goes on. I am going to be buying an inline diffuser. This tank uses no heater and only a canister filter. The temps in our house stay around 68 to 74 degrees depending on the time of year. I will decide my livestock around those temps. I wont be adding any until a few more weeks after my cycle completes from the ADA soil.

I'm already starting to see growth at almost a week since completion. I do have some more planting ideas for the rocks that just peak through the top of the water line.
 

Attachments

#11 ·
Probably 5 to 6 gallons with substrate and rocks. I have Corydoras in my other tank and love those guys.. This tank is going to be on the colder side so probably going to go with some gold White Cloud Mountain minnows.

As soon as the plants get over the shock and start greening up I’m going to bust out my DSLR and take some decent pics.